Console
CoPaw's built-in web interface for chatting, configuring channels, managing sessions, and more.
The Console is CoPaw's built-in web interface. After running copaw app,
open http://127.0.0.1:8088/ in your browser to enter the Console.
In the Console, you can:
- Chat with CoPaw in real time
- Enable/disable messaging channels
- View and manage all chat sessions
- Manage scheduled jobs
- Edit CoPaw's persona and behavior files
- Enable/disable skills to extend CoPaw's capabilities
- Manage MCP clients
- Modify runtime configuration
- Configure LLM providers and select active models
- Manage environment variables needed by tools
The sidebar on the left groups features into Chat, Control, Agent, and Settings. Click any item to switch pages. The sections below walk through each feature in order.
Not seeing the Console? Make sure the frontend has been built. See CLI.
Chat
Sidebar: Chat → Chat
This is where you talk to CoPaw. It is the default page when the Console opens.
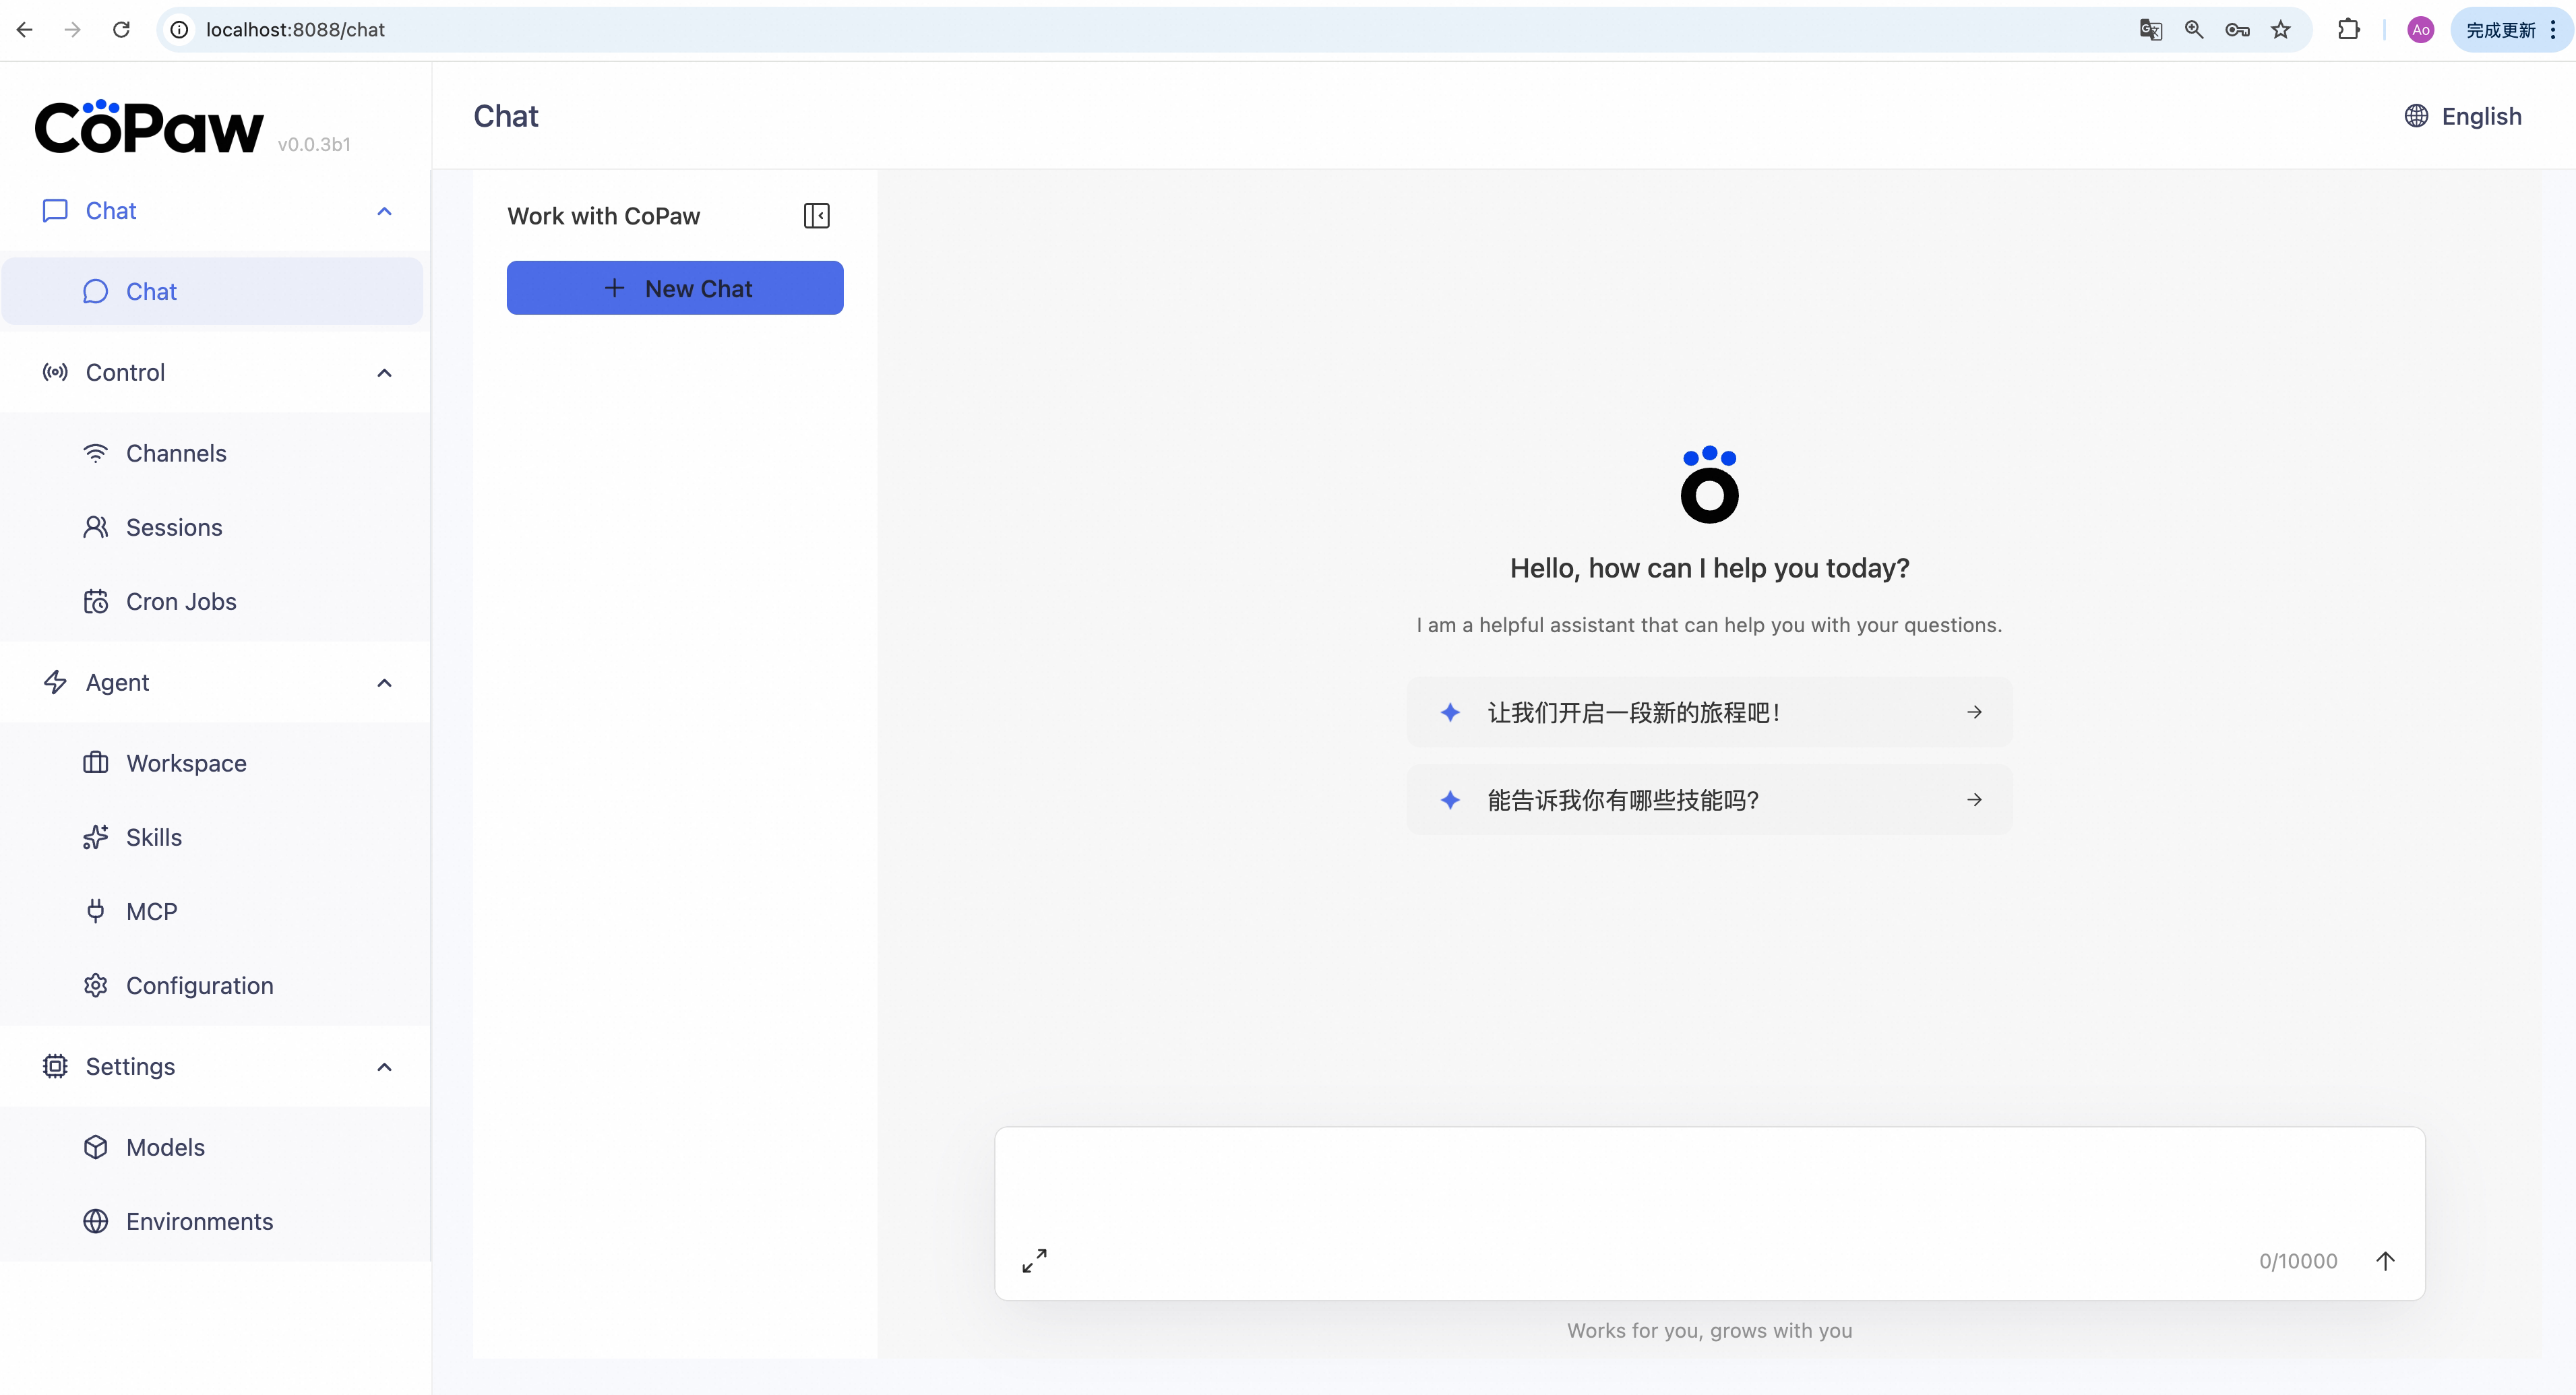
Send a message: Type in the input box at the bottom, then press Enter or click the send button (↑). CoPaw replies in real time.
Create a new session: Click the + New Chat button at the top of the chat sidebar to start a new conversation. Each session keeps separate history.
Switch sessions: Click any session name in the chat sidebar to load its history.
Delete a session: Click the ··· button on a session item, then click the trash icon.
Channels
Sidebar: Control → Channels
Manage channel for DingTalk, Feishu, Discord, QQ, iMessage, and Console.
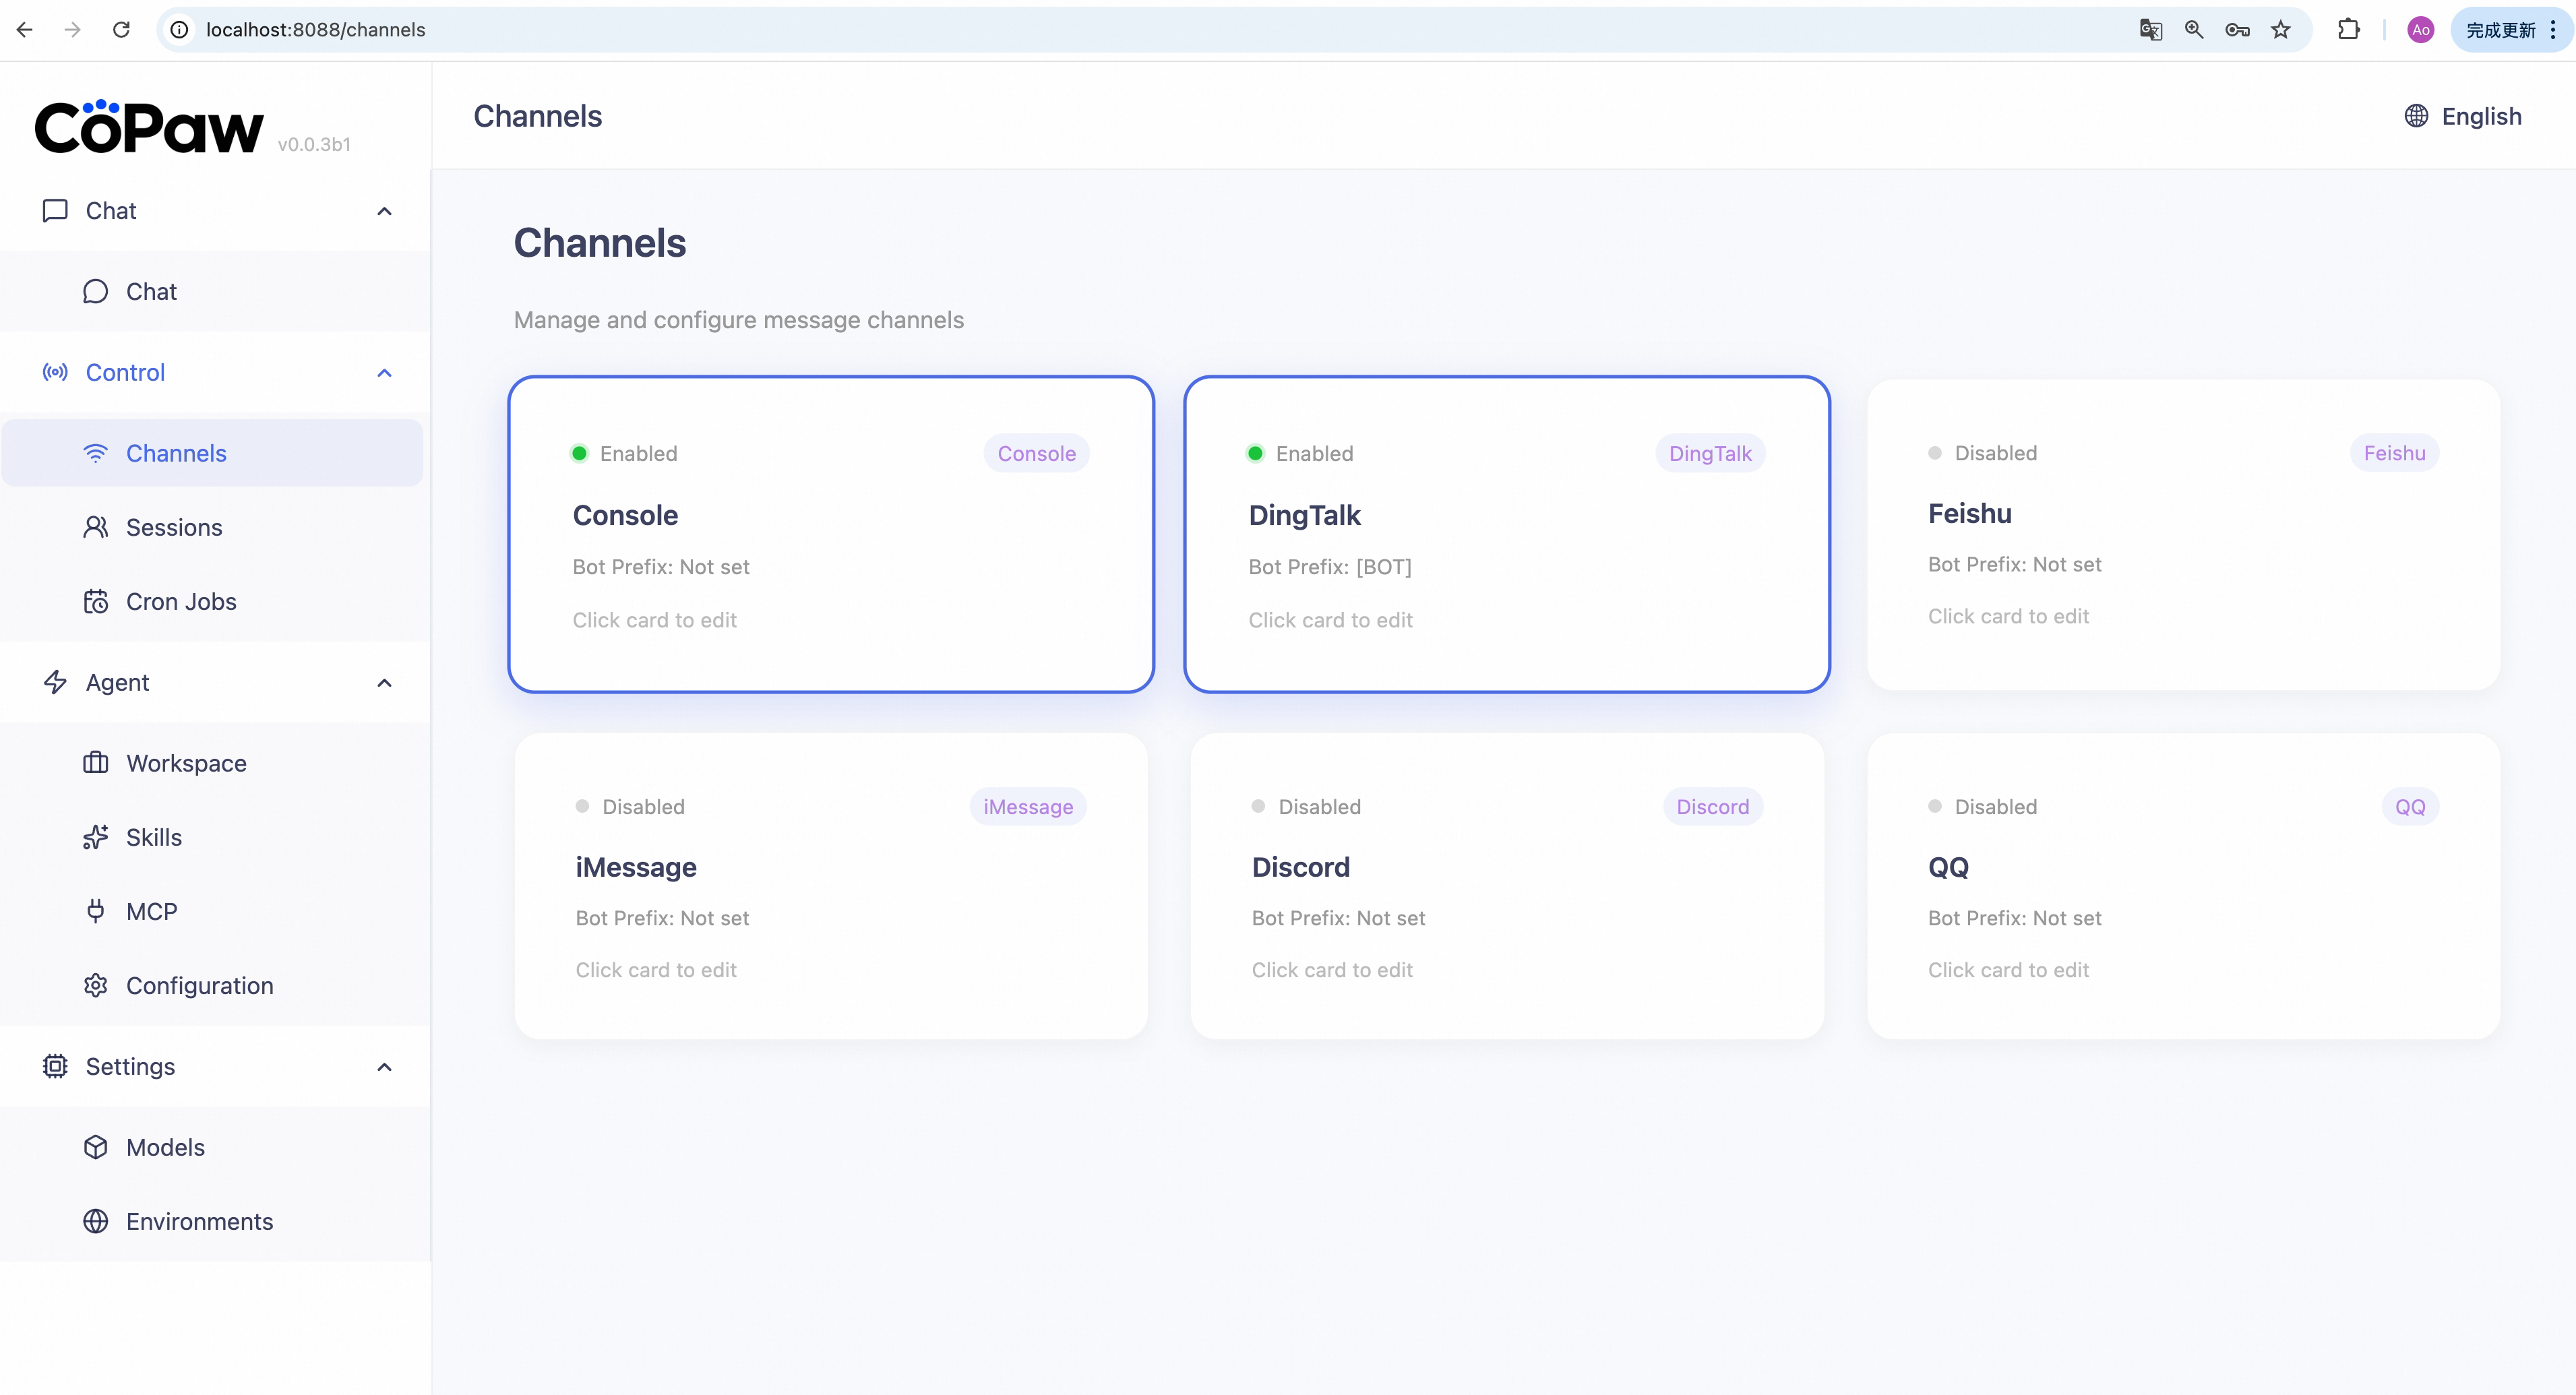
Enable a channel:
- Click the channel card you want to configure.
-
A settings panel slides out on the right. Turn on Enable.
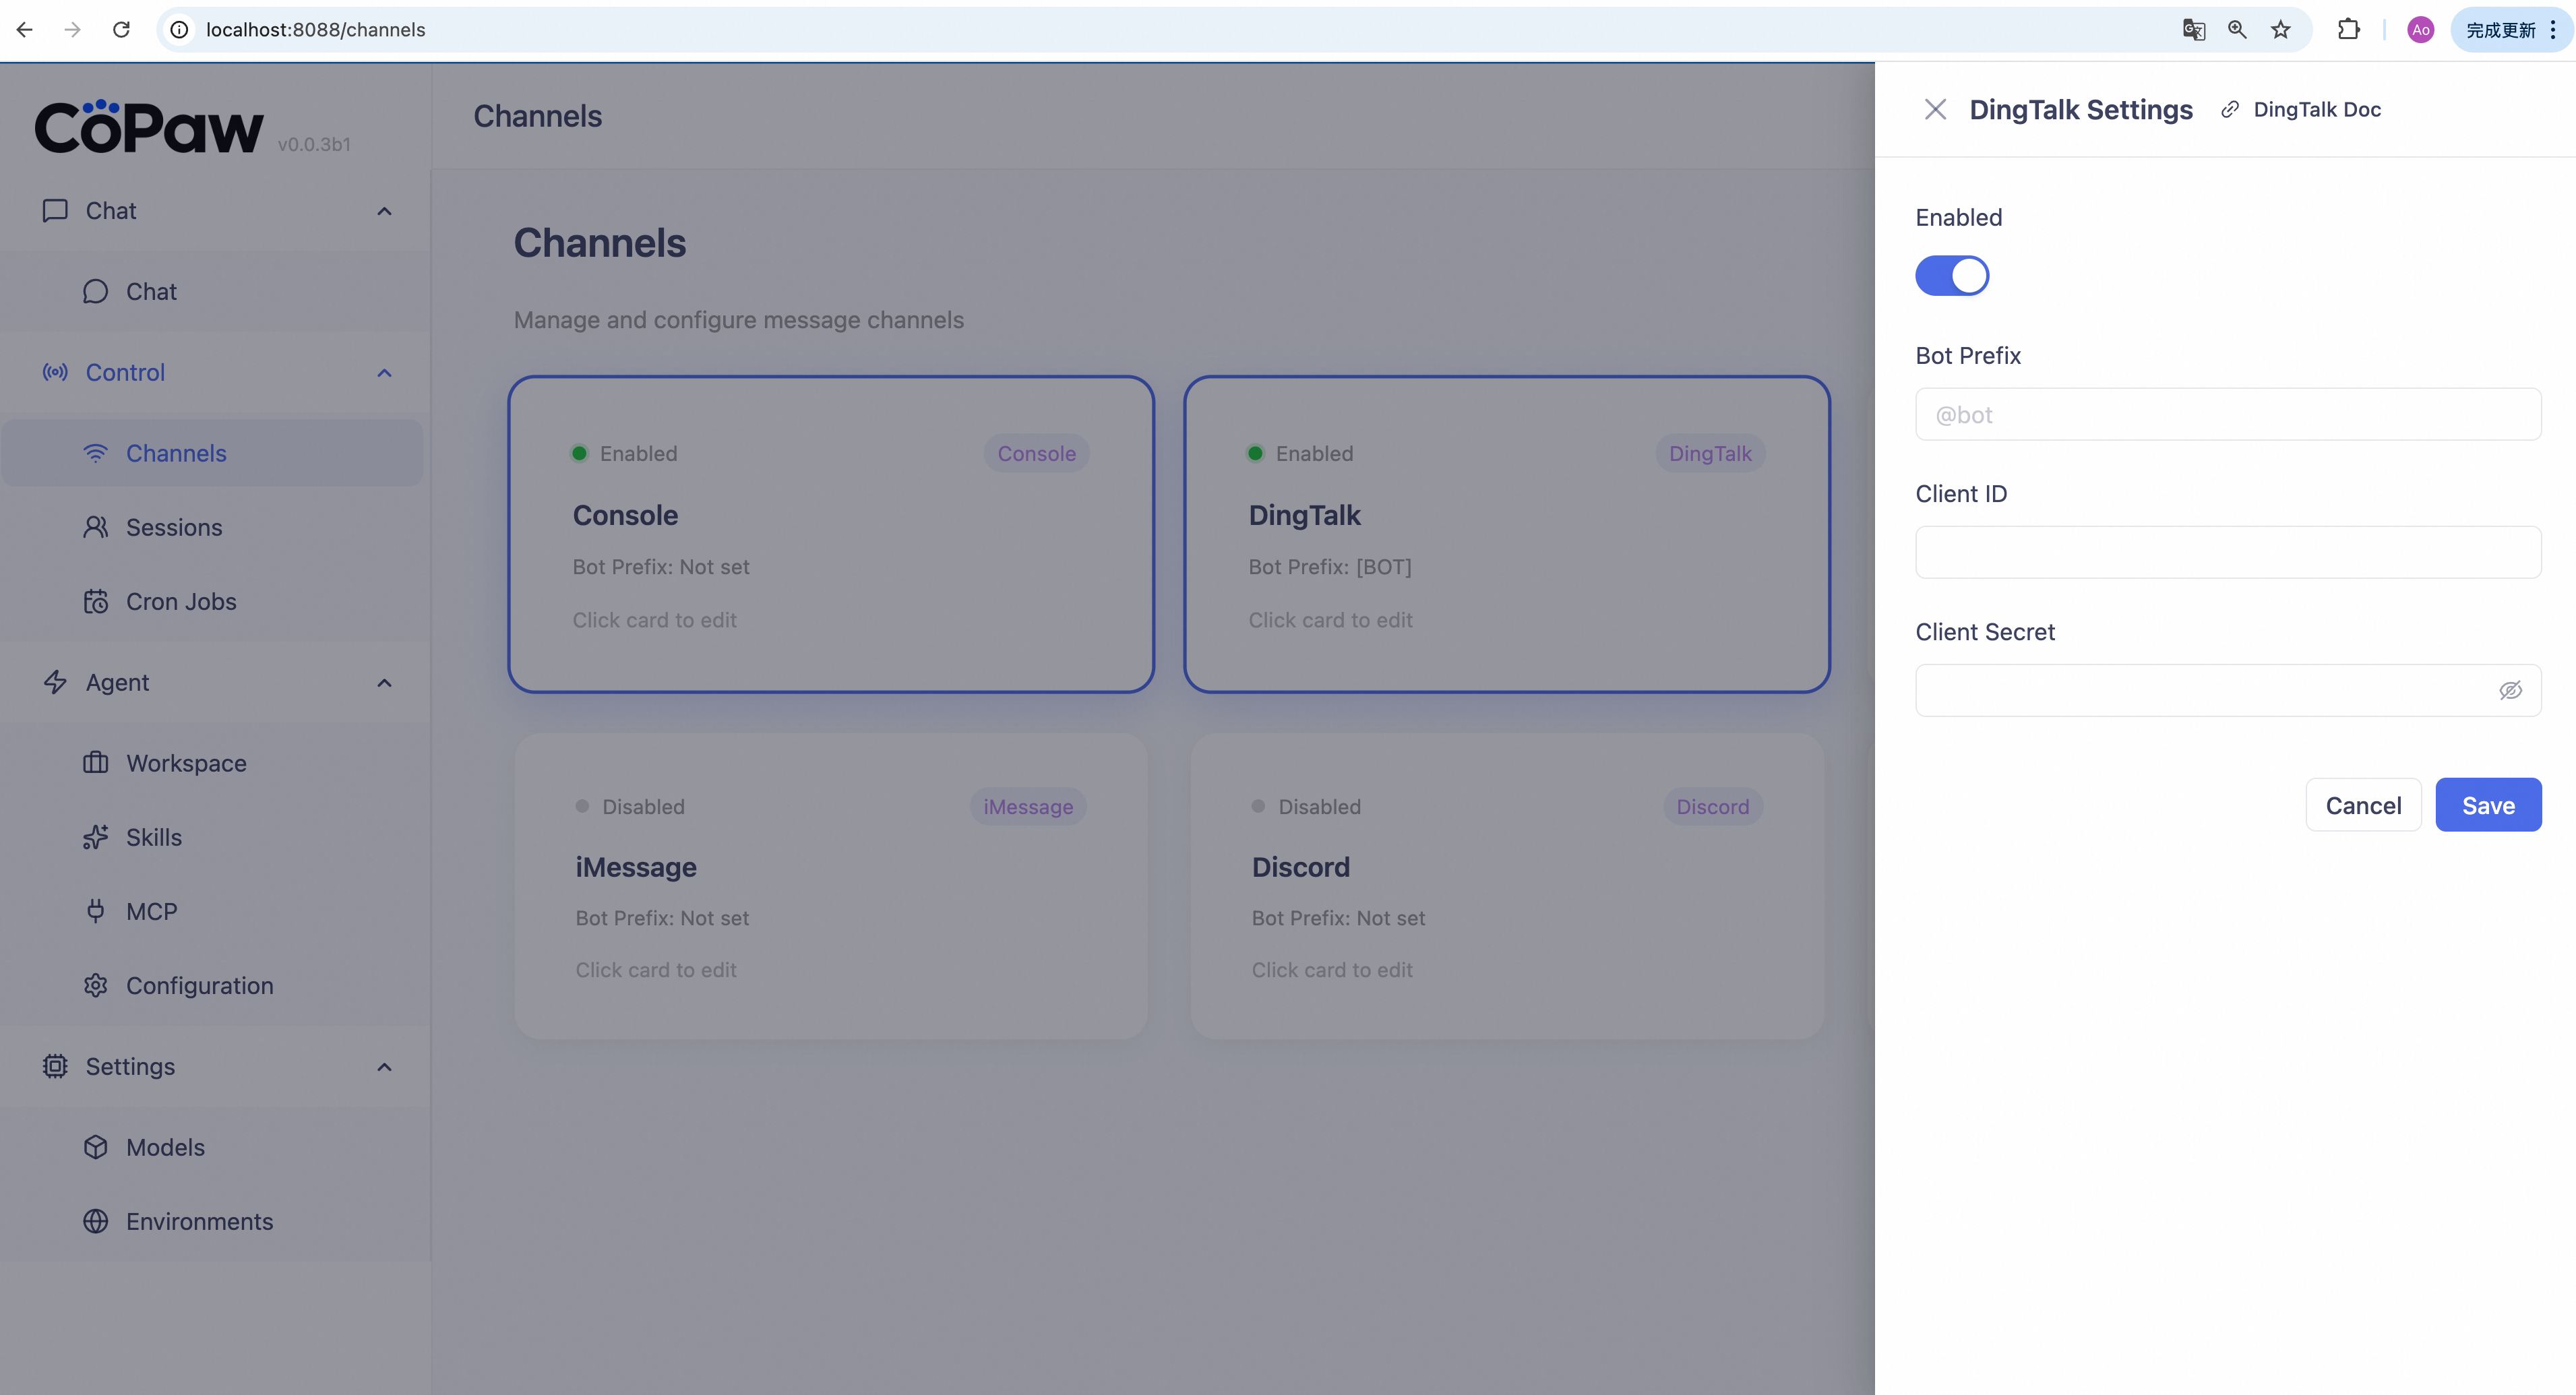
-
Fill in required credentials (fields differ by channel):
Channel Required fields DingTalk Client ID, Client Secret Feishu App ID, App Secret, Encrypt Key, Verification Token, Media Dir Discord Bot Token, HTTP Proxy, Proxy Auth QQ App ID, Client Secret iMessage Database path, Poll interval Console (toggle only) - Click Save. Changes take effect in seconds, no restart required.
Disable a channel: Open the same panel, turn off Enable, then click Save.
For credential setup details, see Channels.
Sessions
Sidebar: Control → Sessions
View, filter, and clean up chat sessions across all channels.
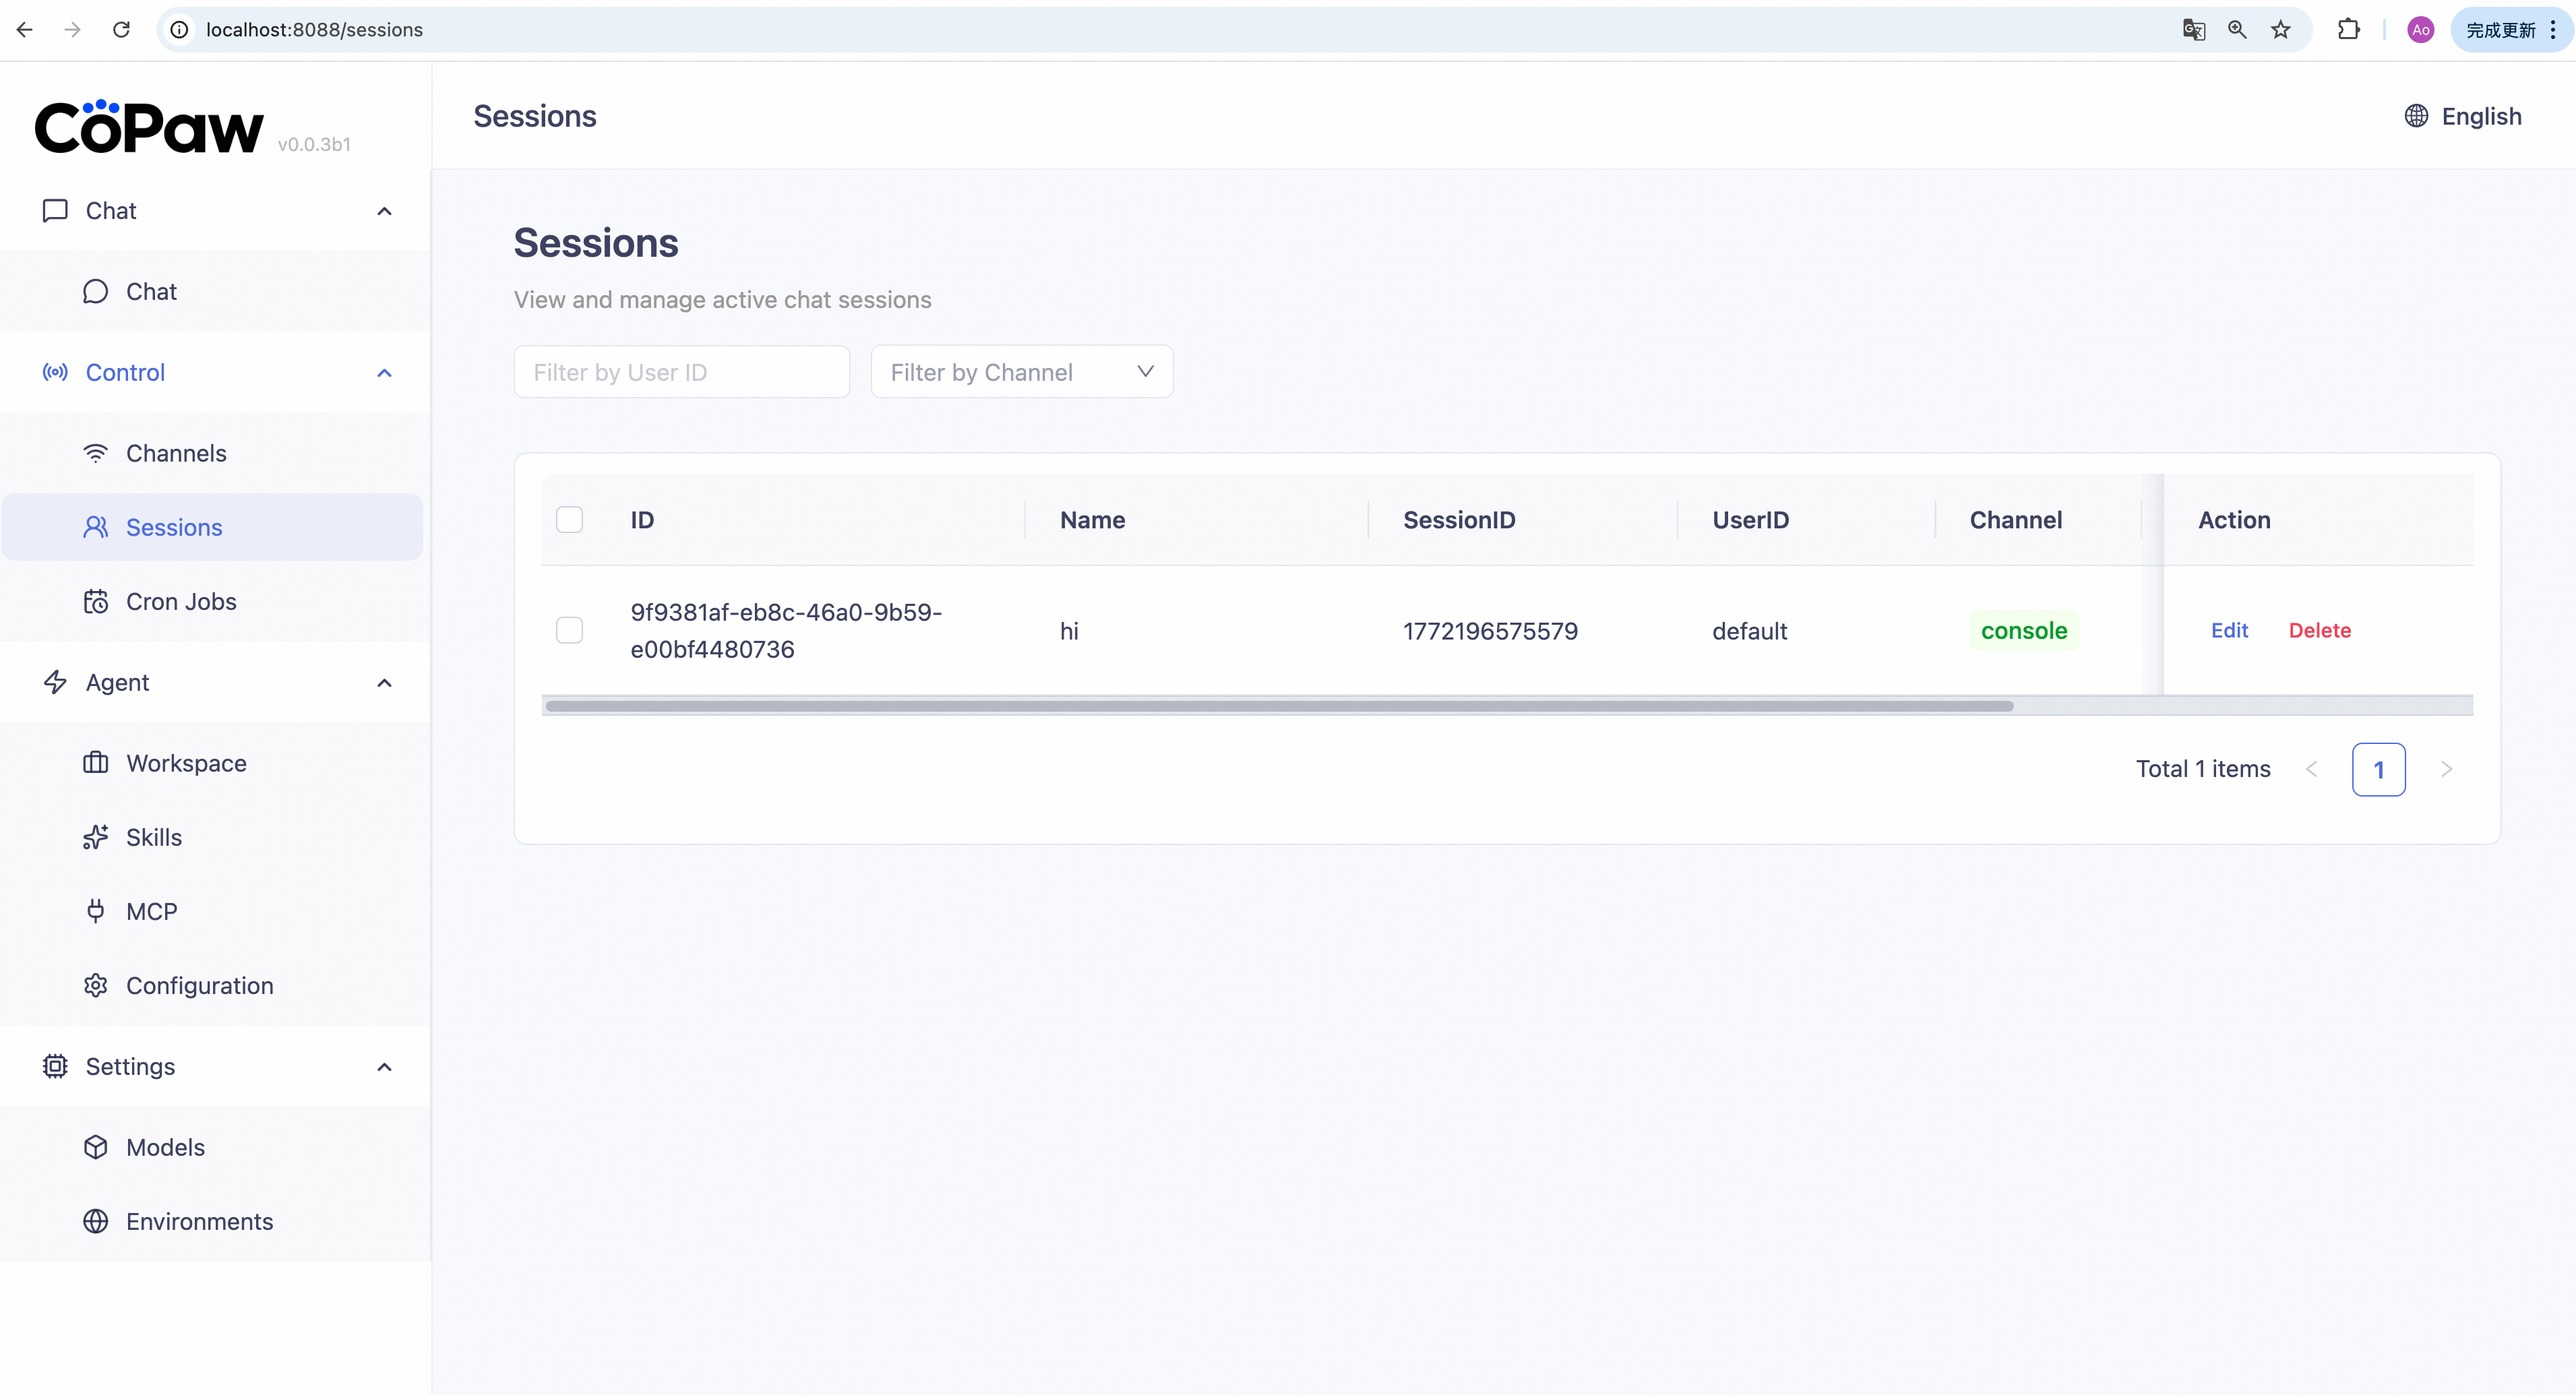
Find sessions: Use the search box to filter by user, or use the dropdown to filter by channel. The table updates immediately.
Rename a session: Click Edit on a row → change the name → click Save.
Delete one session: Click Delete on a row → confirm.
Batch delete: Select rows → click Batch Delete → confirm.
Cron Jobs
Sidebar: Control → Cron Jobs
Create and manage scheduled jobs that CoPaw runs automatically by time.
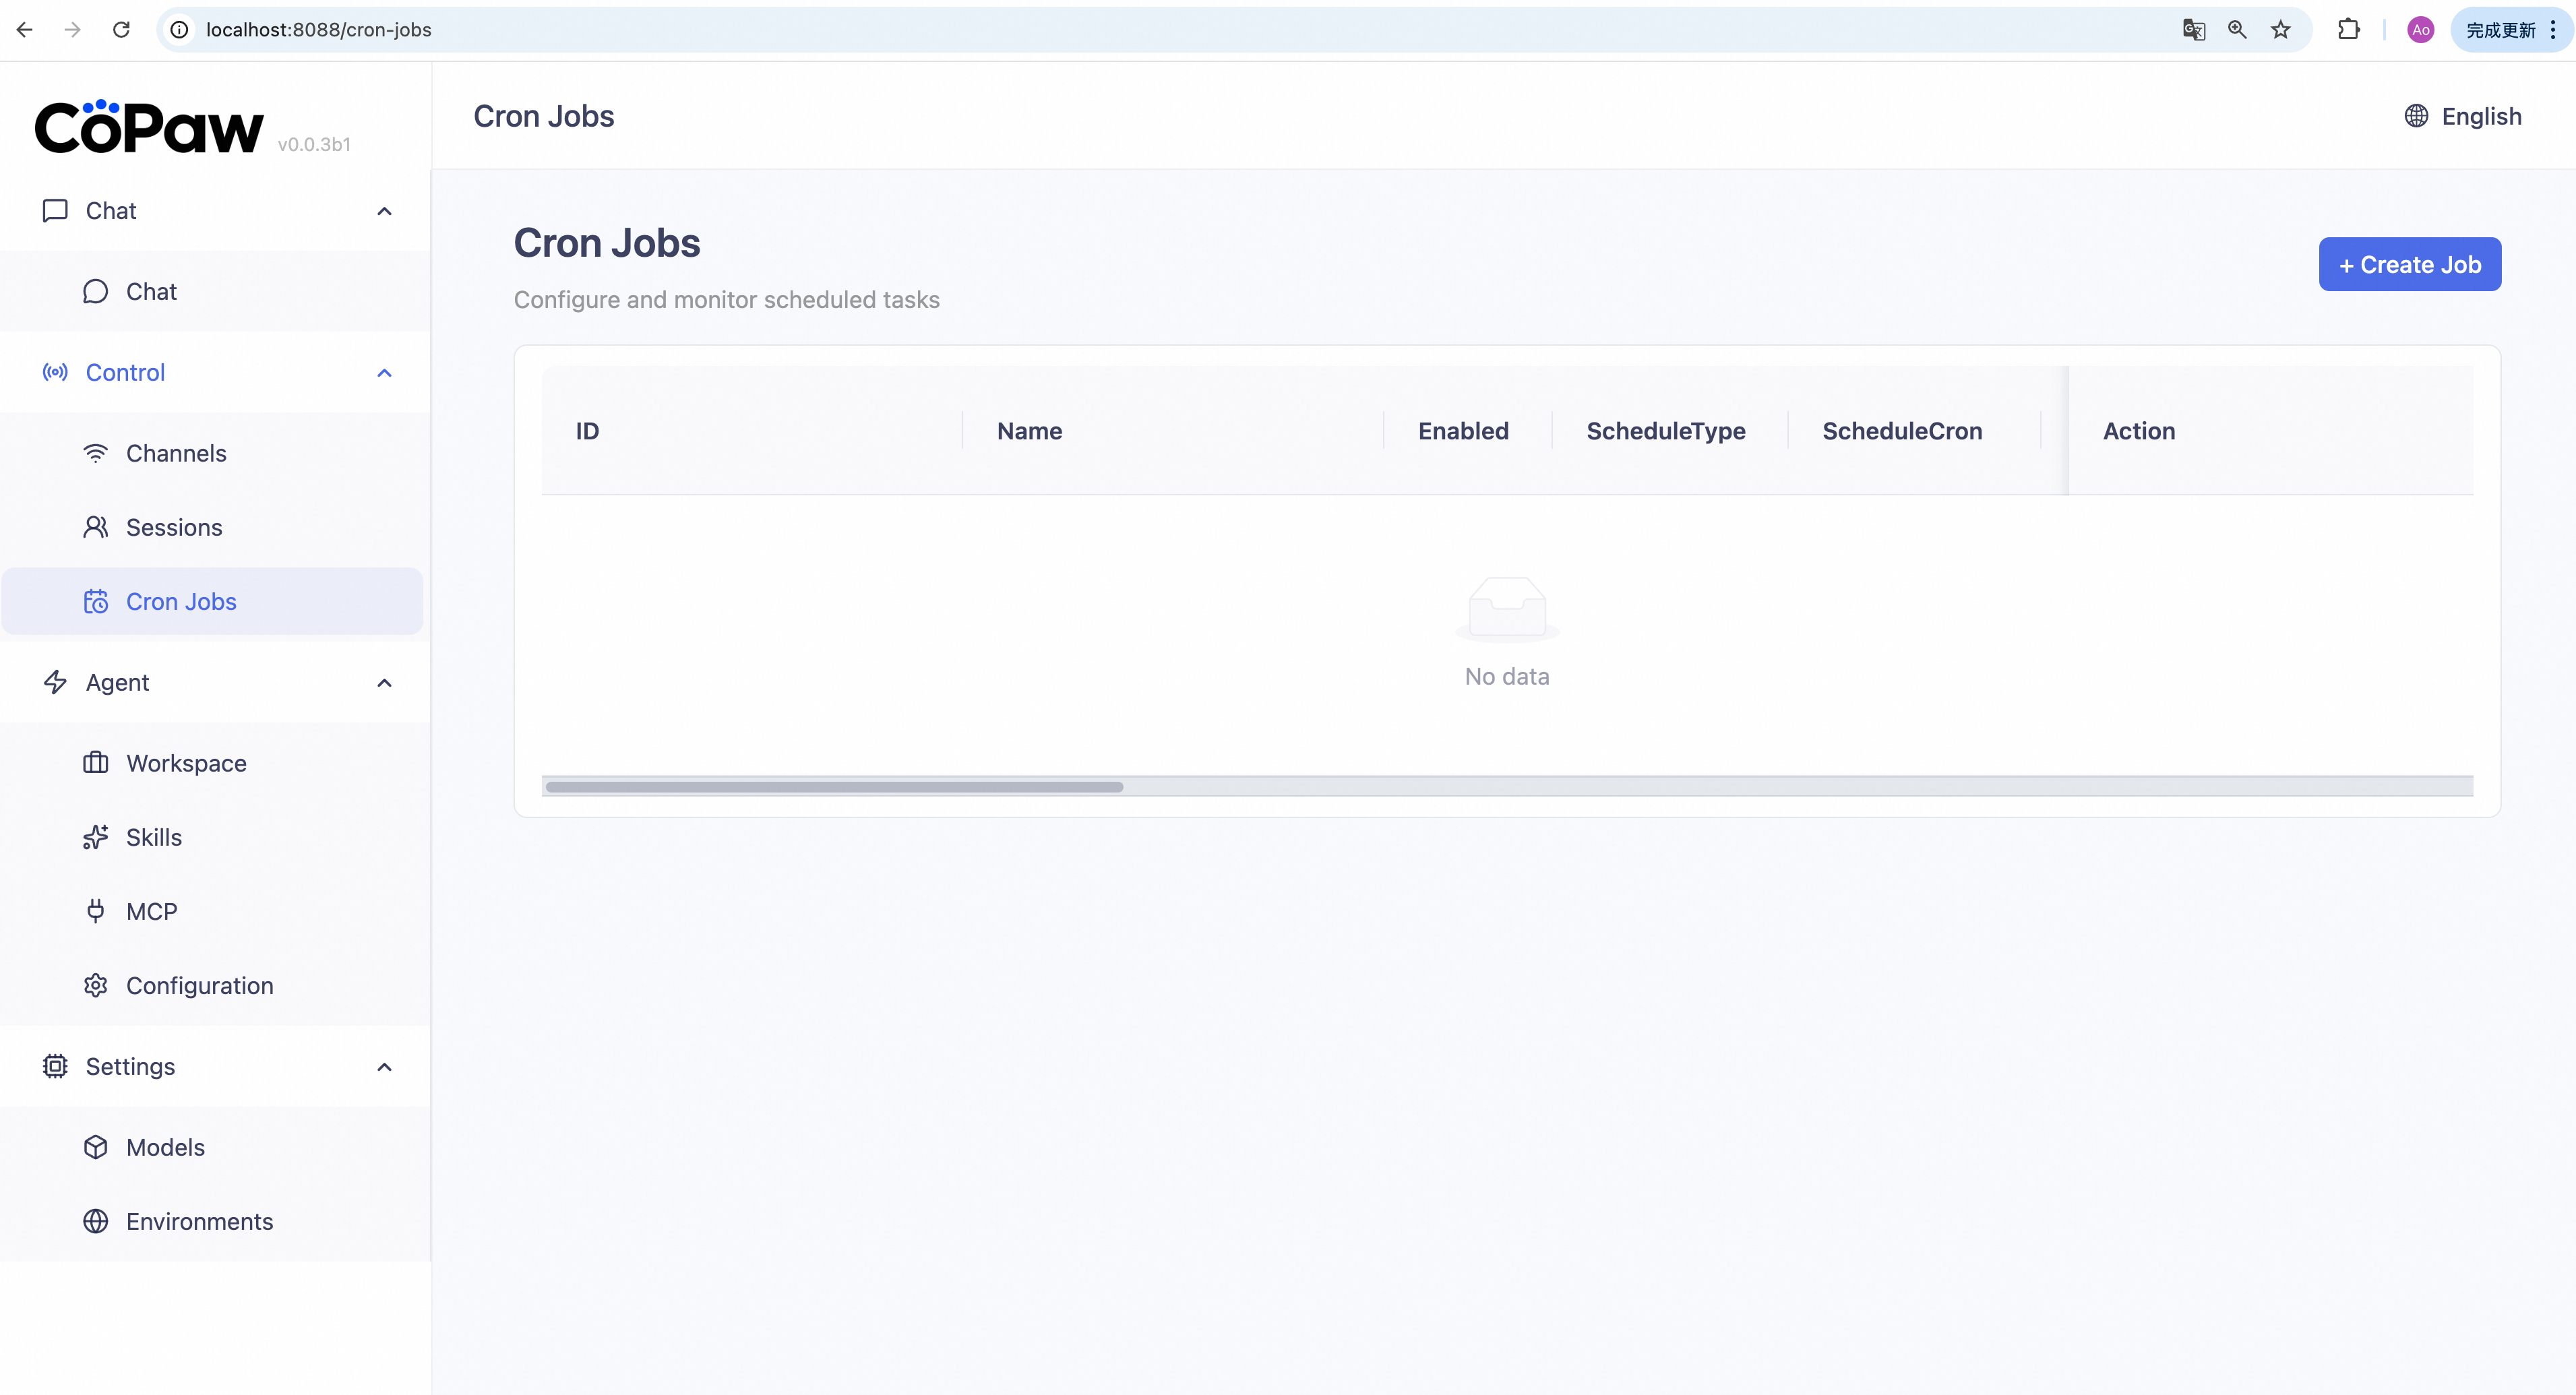
Create a new job:
-
Click + Create Job.
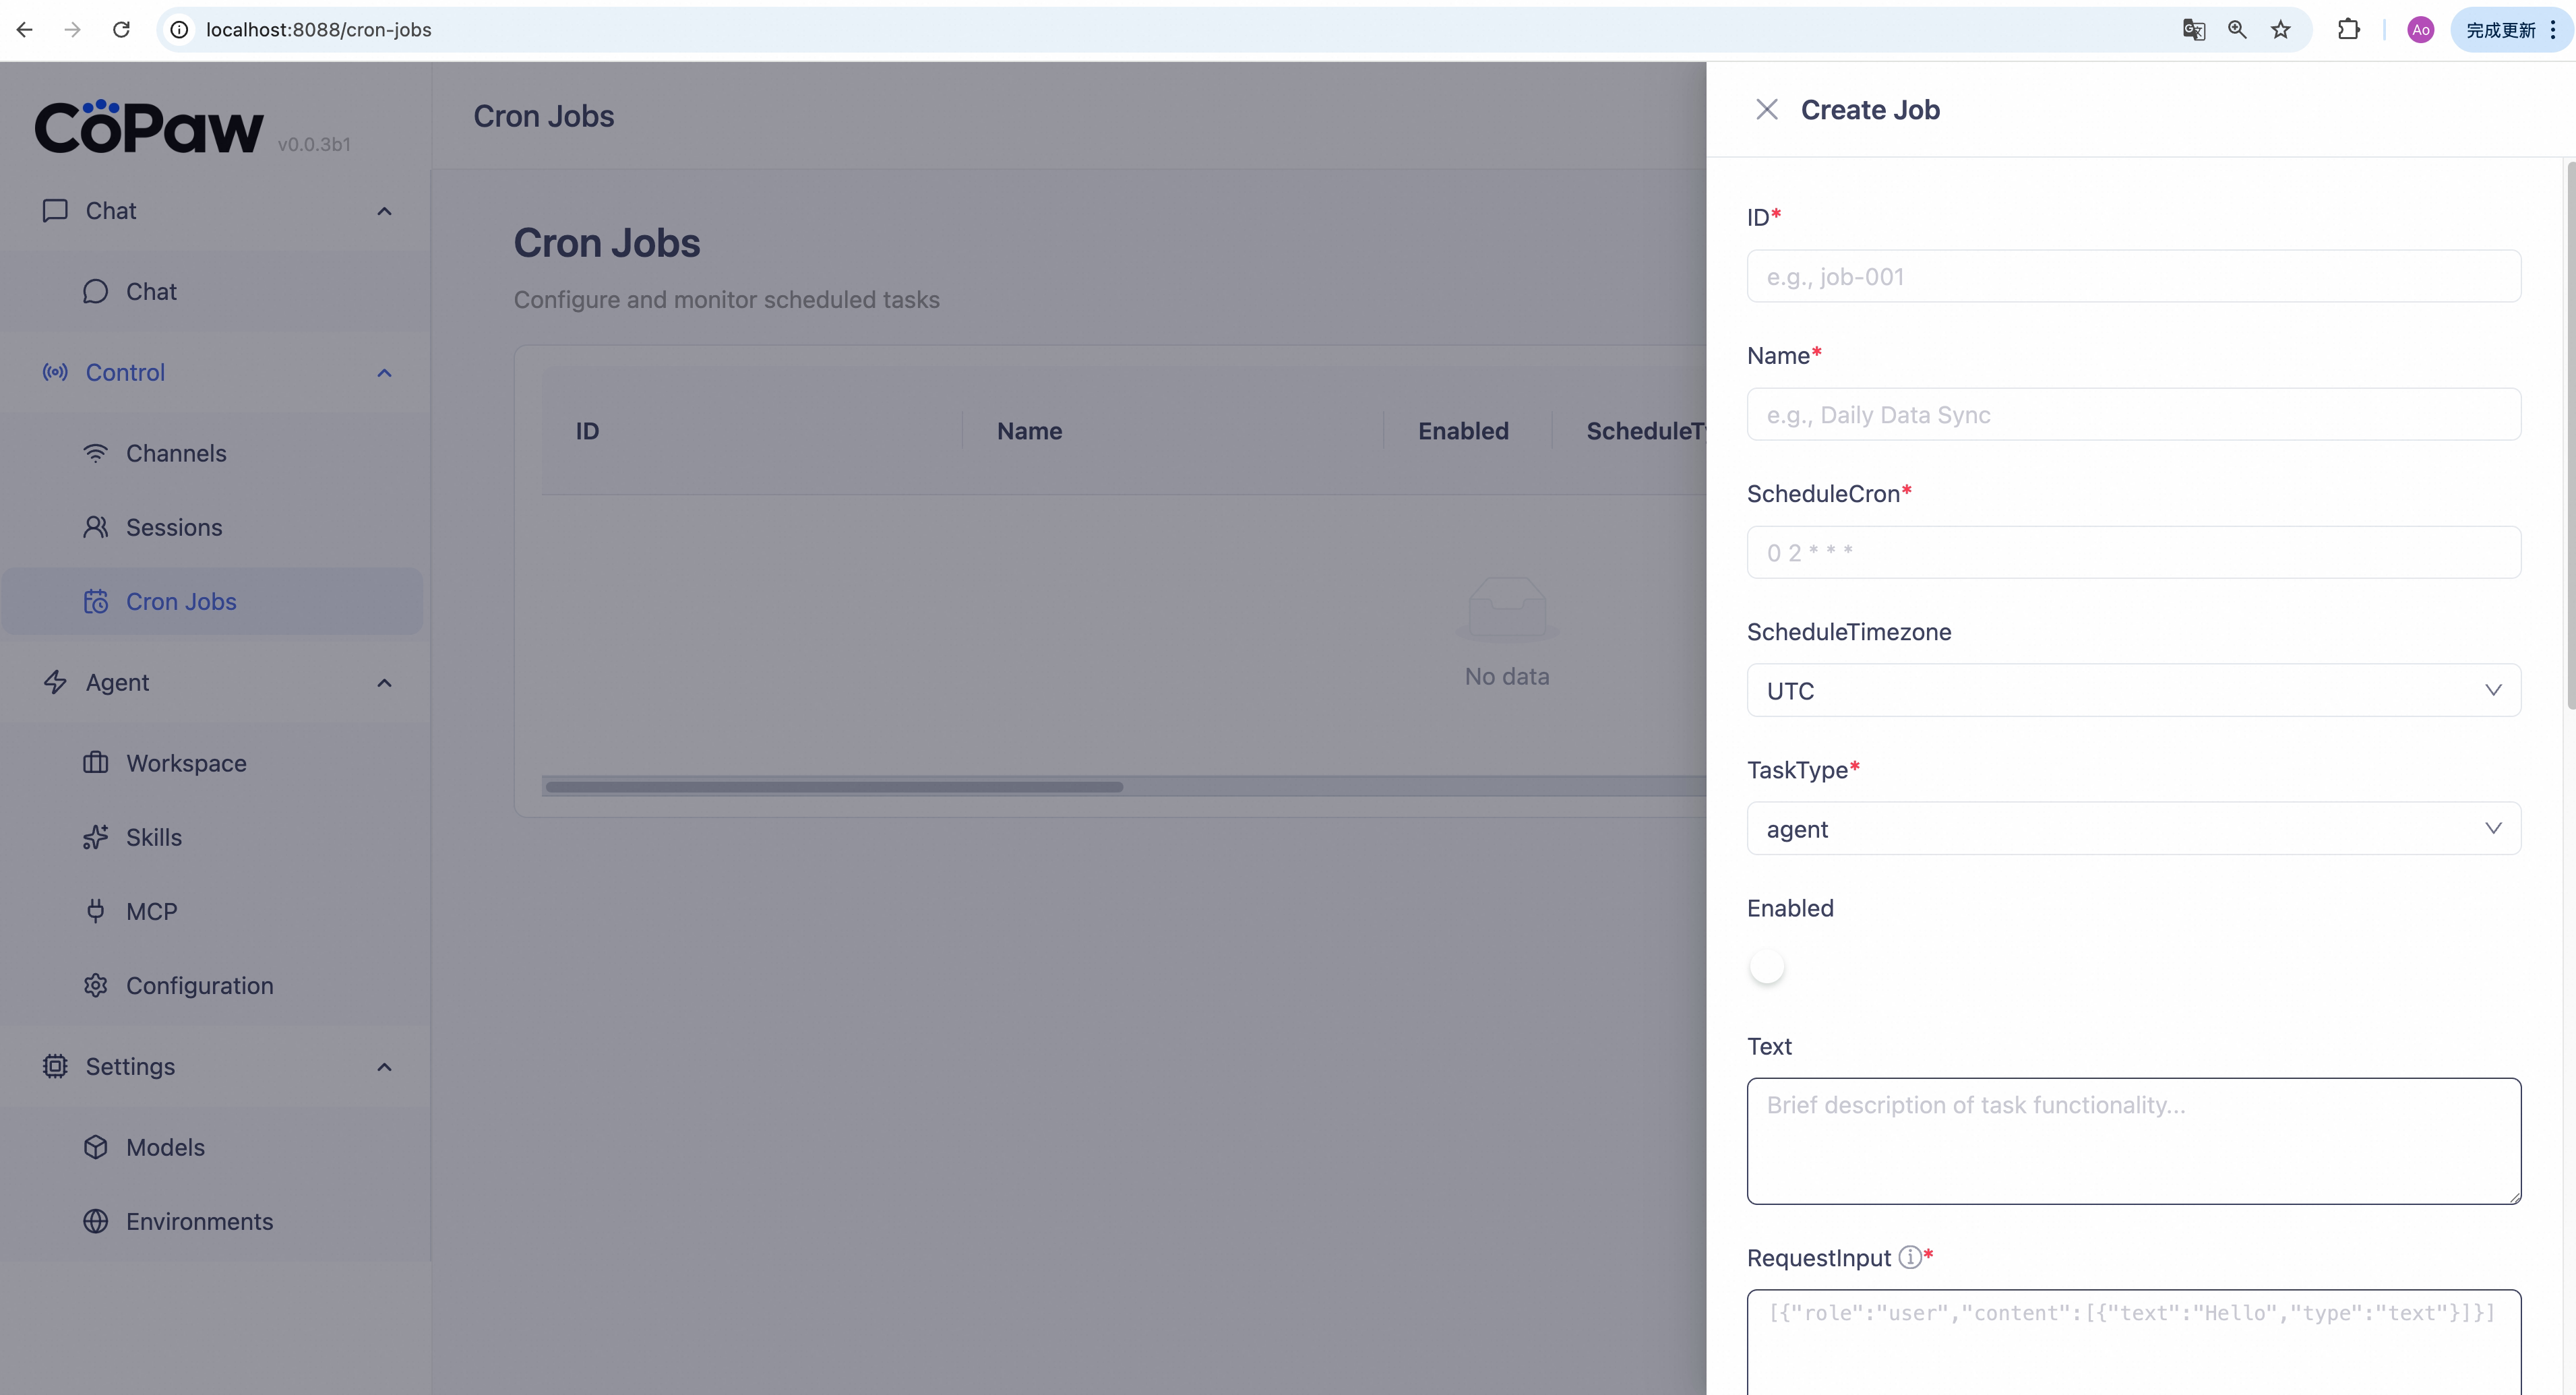
- Fill in each section:
- Basic Info — Job ID (e.g.
job-001) and job name (e.g. "Daily Summary"). - Schedule — Cron expression (e.g.
0 9 * * *= 9:00 AM daily) and timezone - Task Type & Content — Text (fixed message) or Agent (ask CoPaw and forward reply), then the content
- Delivery — Target channel (Console, DingTalk, etc.), target user & session id, and mode (Stream = real-time, Final = one complete response)
- Advanced — Max concurrency, timeout, misfire grace time
- Basic Info — Job ID (e.g.
- Click Save.
Edit a job: Click Edit on a row → modify fields → Save.
Enable/disable a job: Toggle the switch in the row.
Run once immediately: Click Execute Now → confirm.
Delete a job: Click Delete → confirm.
Workspace
Sidebar: Agent → Workspace
Edit files that define CoPaw's persona and behavior, such as SOUL.md,
AGENTS.md, and HEARTBEAT.md, directly in the browser.
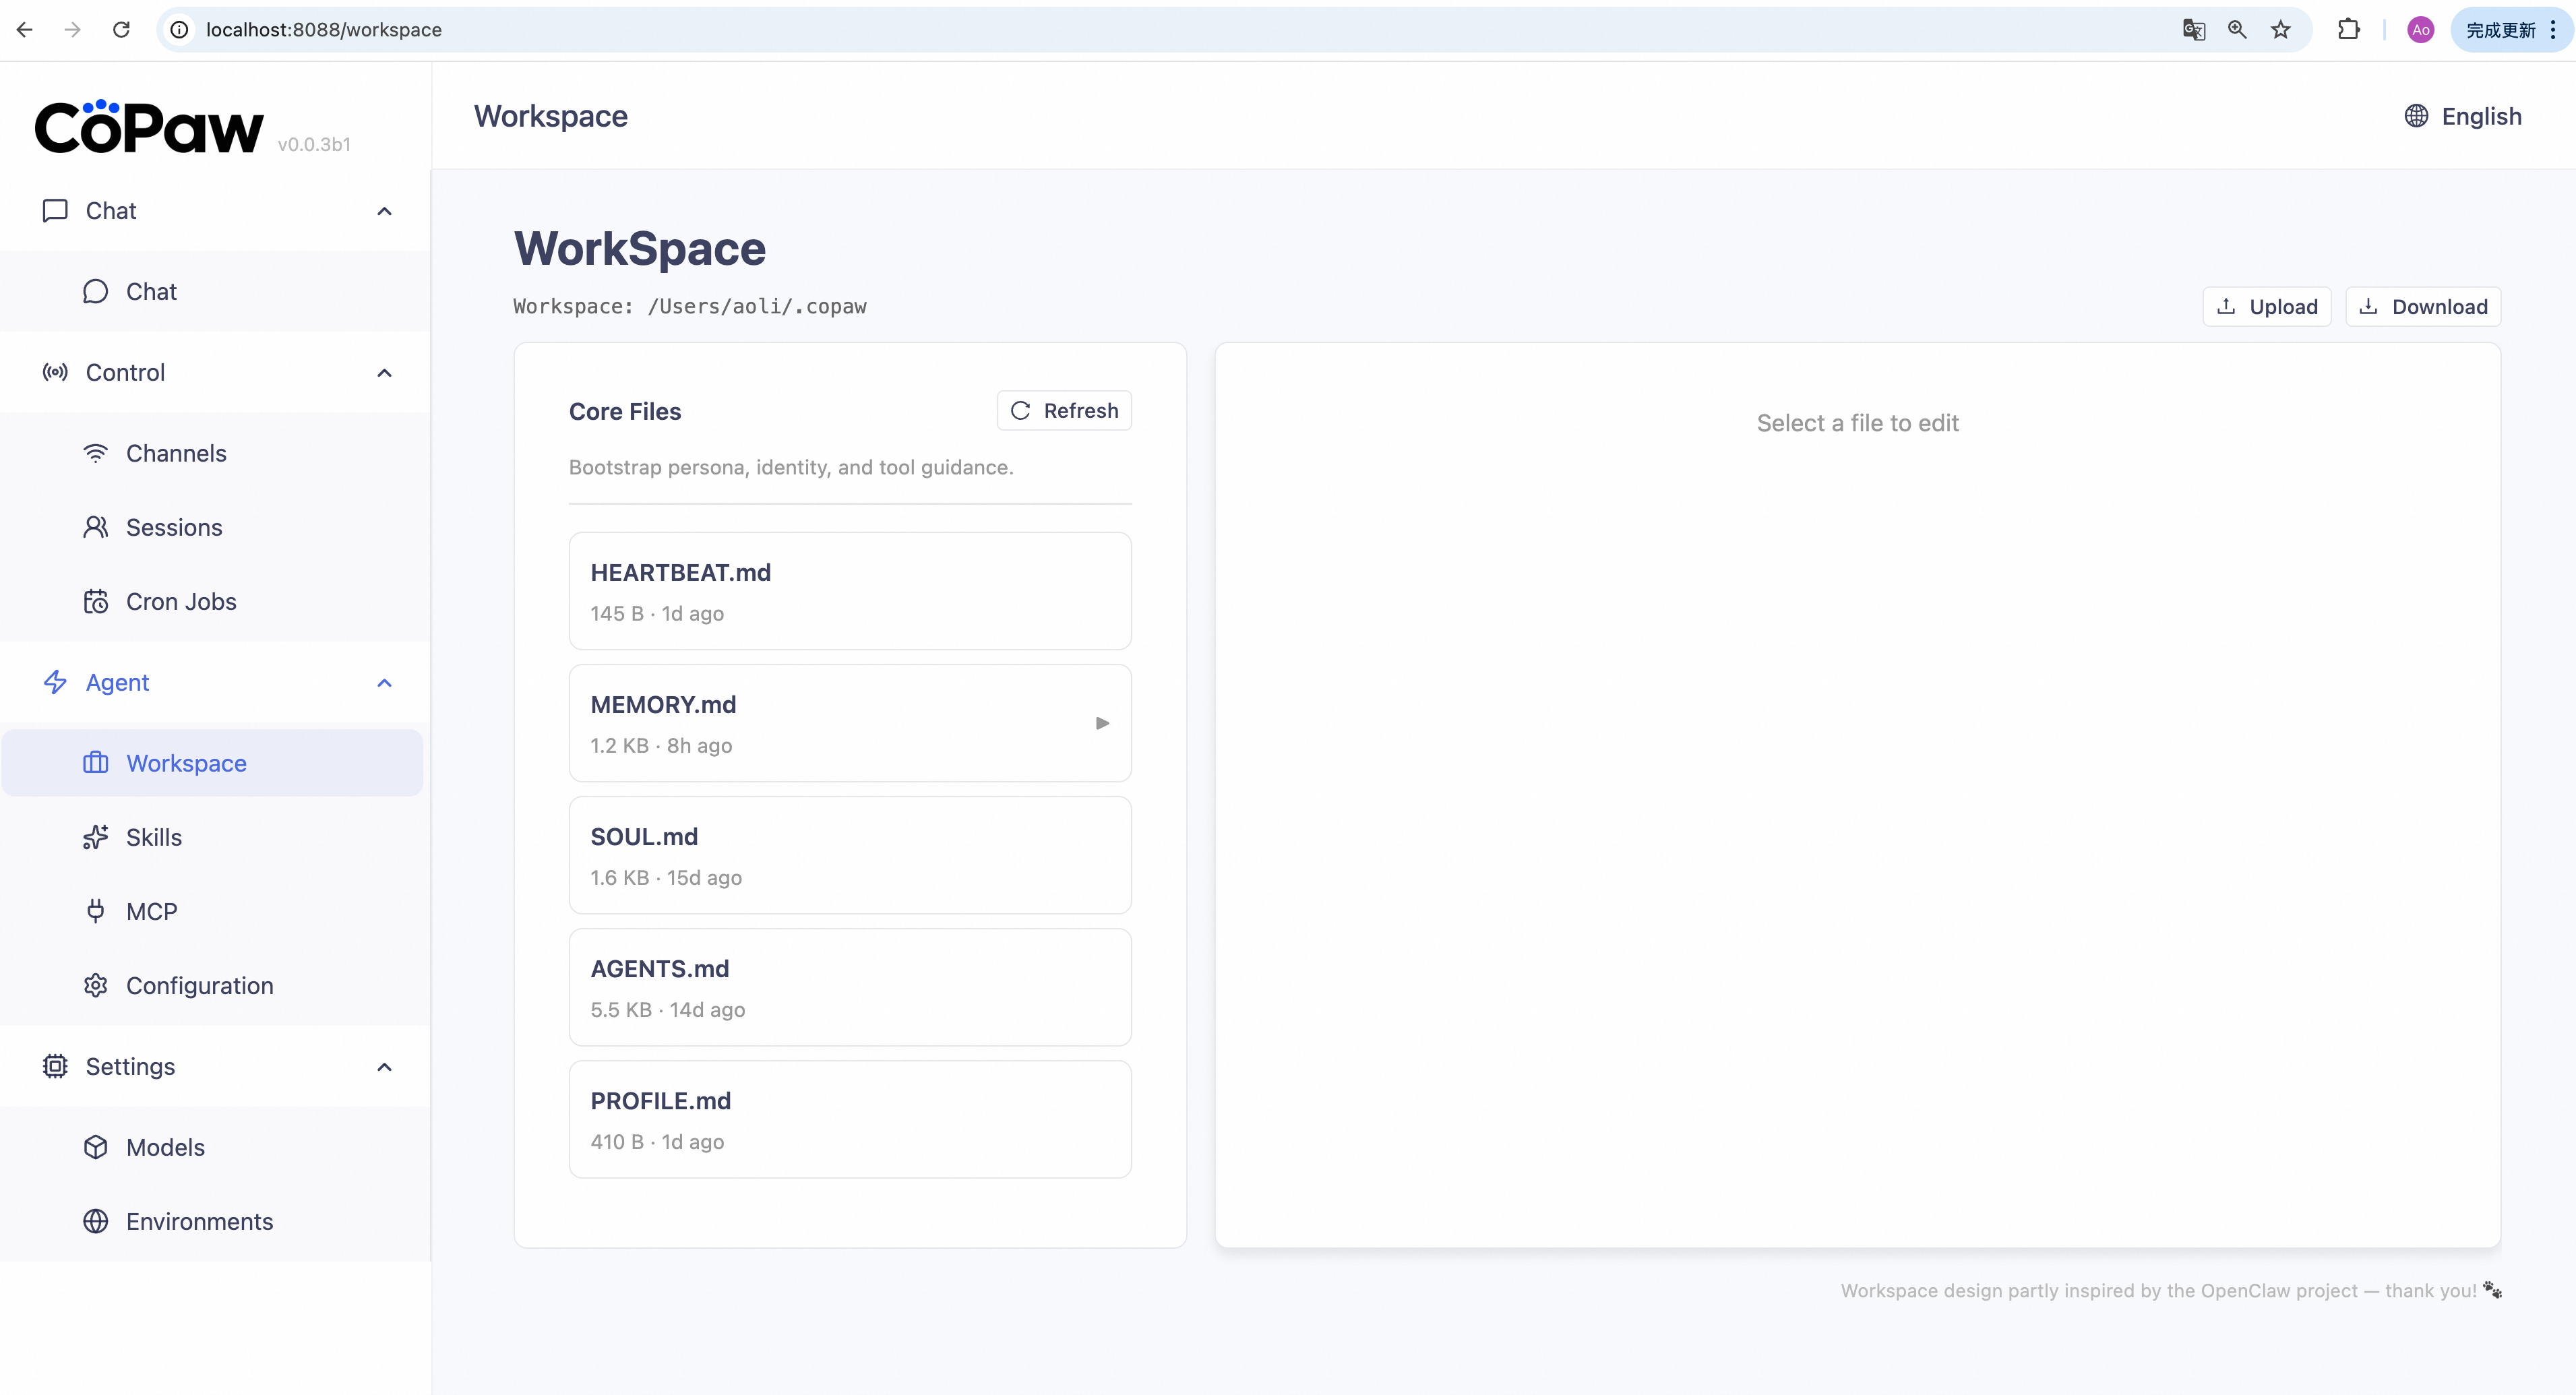
Edit files:
- Click a file in the list (e.g.
SOUL.md). - The editor shows file content. Make your changes.
- Click Save to apply, or Reset to discard and reload.
View daily memory:
If MEMORY.md exists, click the ▶ arrow to expand date-based entries.
Click a date to view or edit that day's memory.
Download workspace:
Click Download (↓) to export the entire workspace as a .zip.
Upload/restore workspace:
Click Upload (↑) → choose a .zip (max 100 MB). Existing workspace files
will be replaced. Useful for migration and backup restore.
Skills
Sidebar: Agent → Skills
Manage skills that extend CoPaw's capabilities (for example: PDF reading, Word document creation, news retrieval).
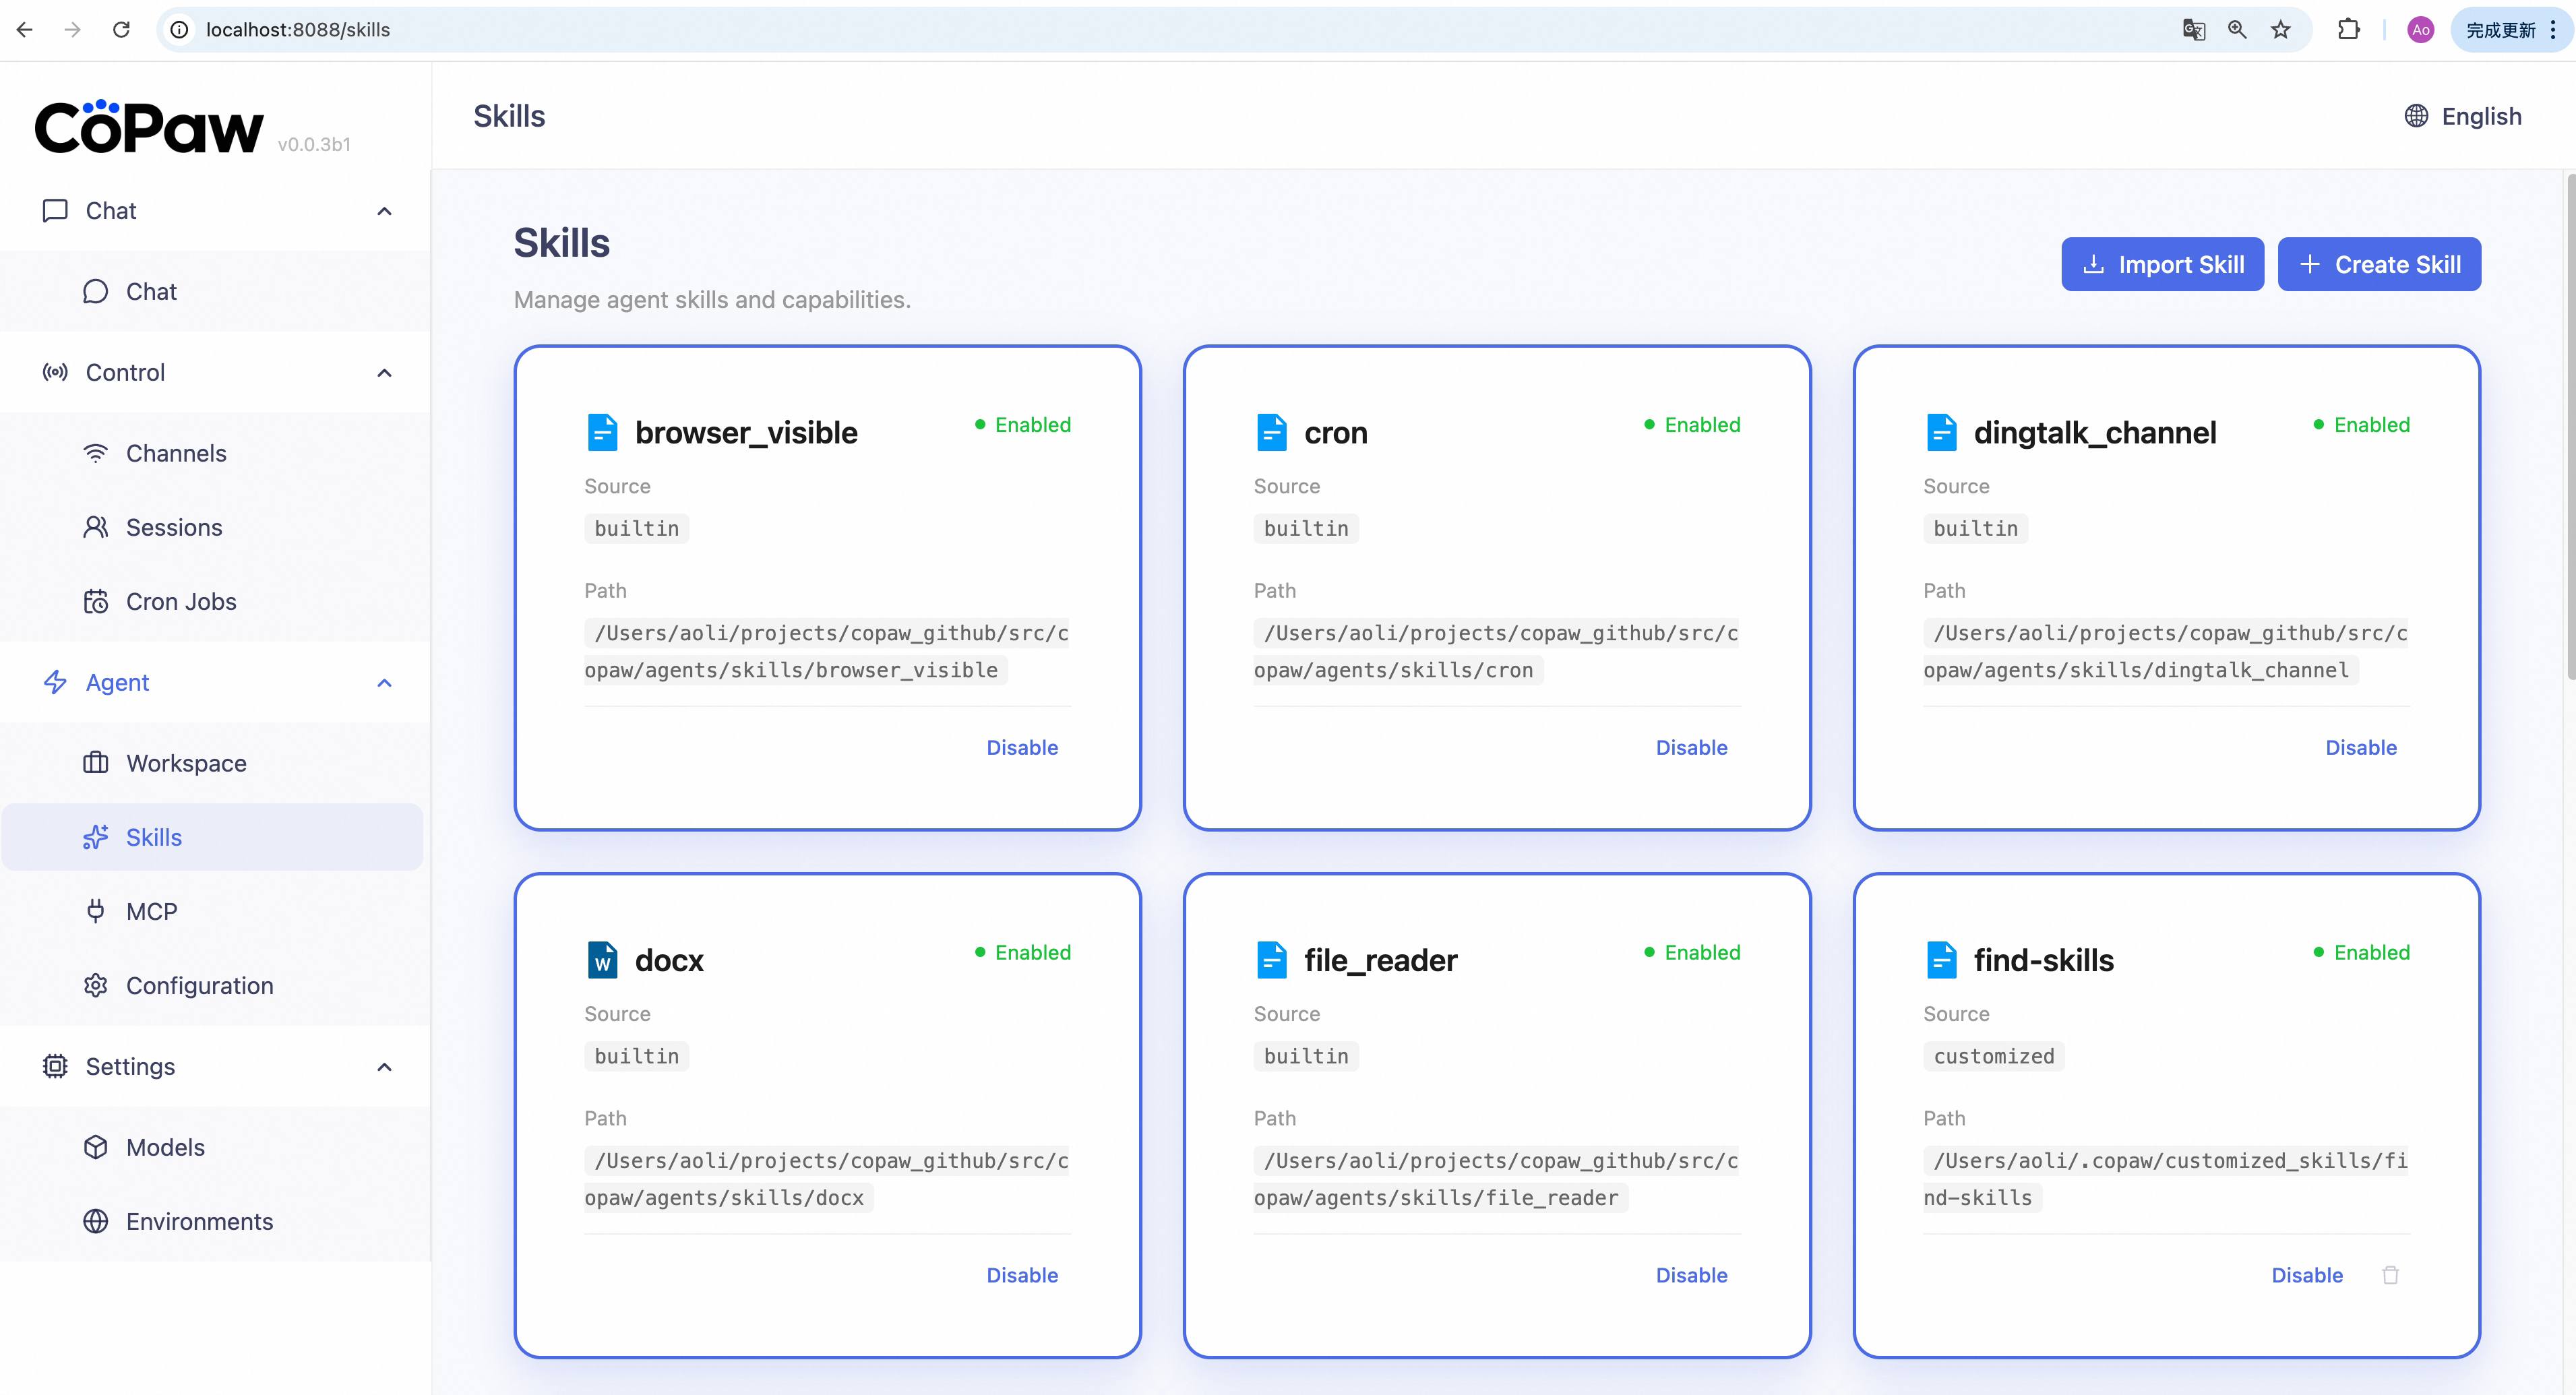
Enable a skill: Click Enable at the bottom of a skill card. It takes effect immediately.
View skill details: Click a skill card to open its full description.
Disable a skill: Click Disable. It also takes effect immediately.
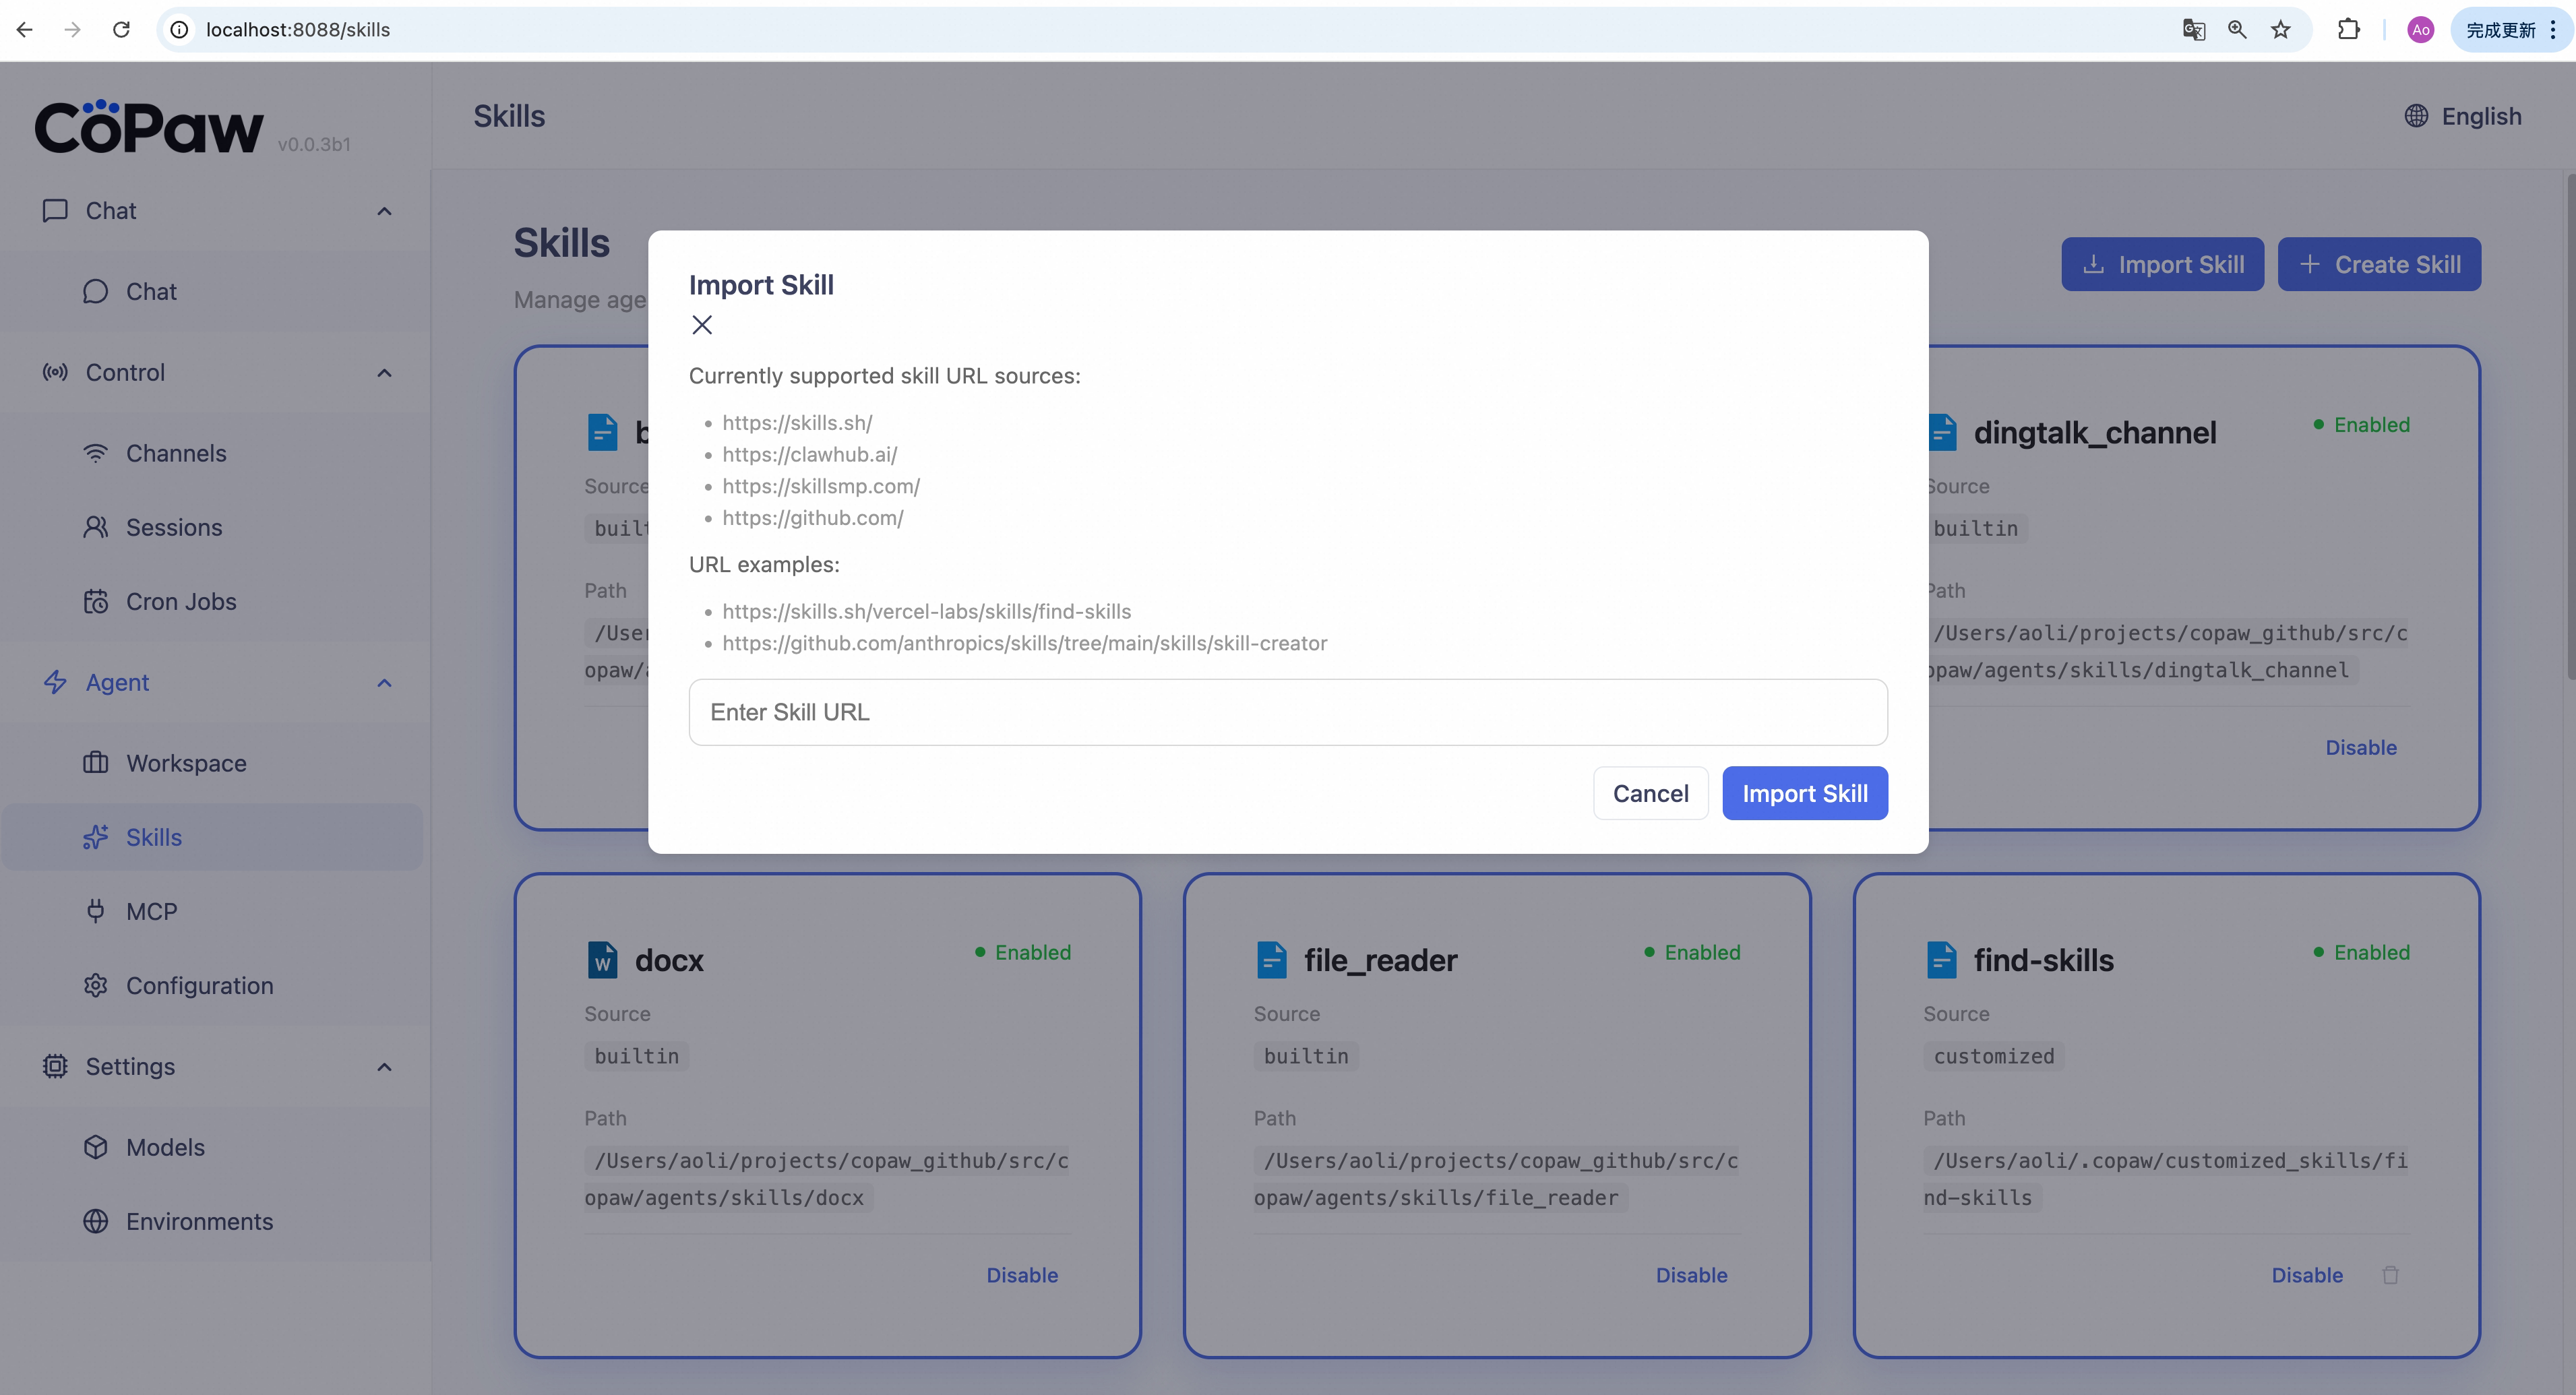
Import from Skill Hub:
- Click Import Skill.
- Enter a skill URL, then click import.
- Wait for import to complete. The skill appears as enabled.
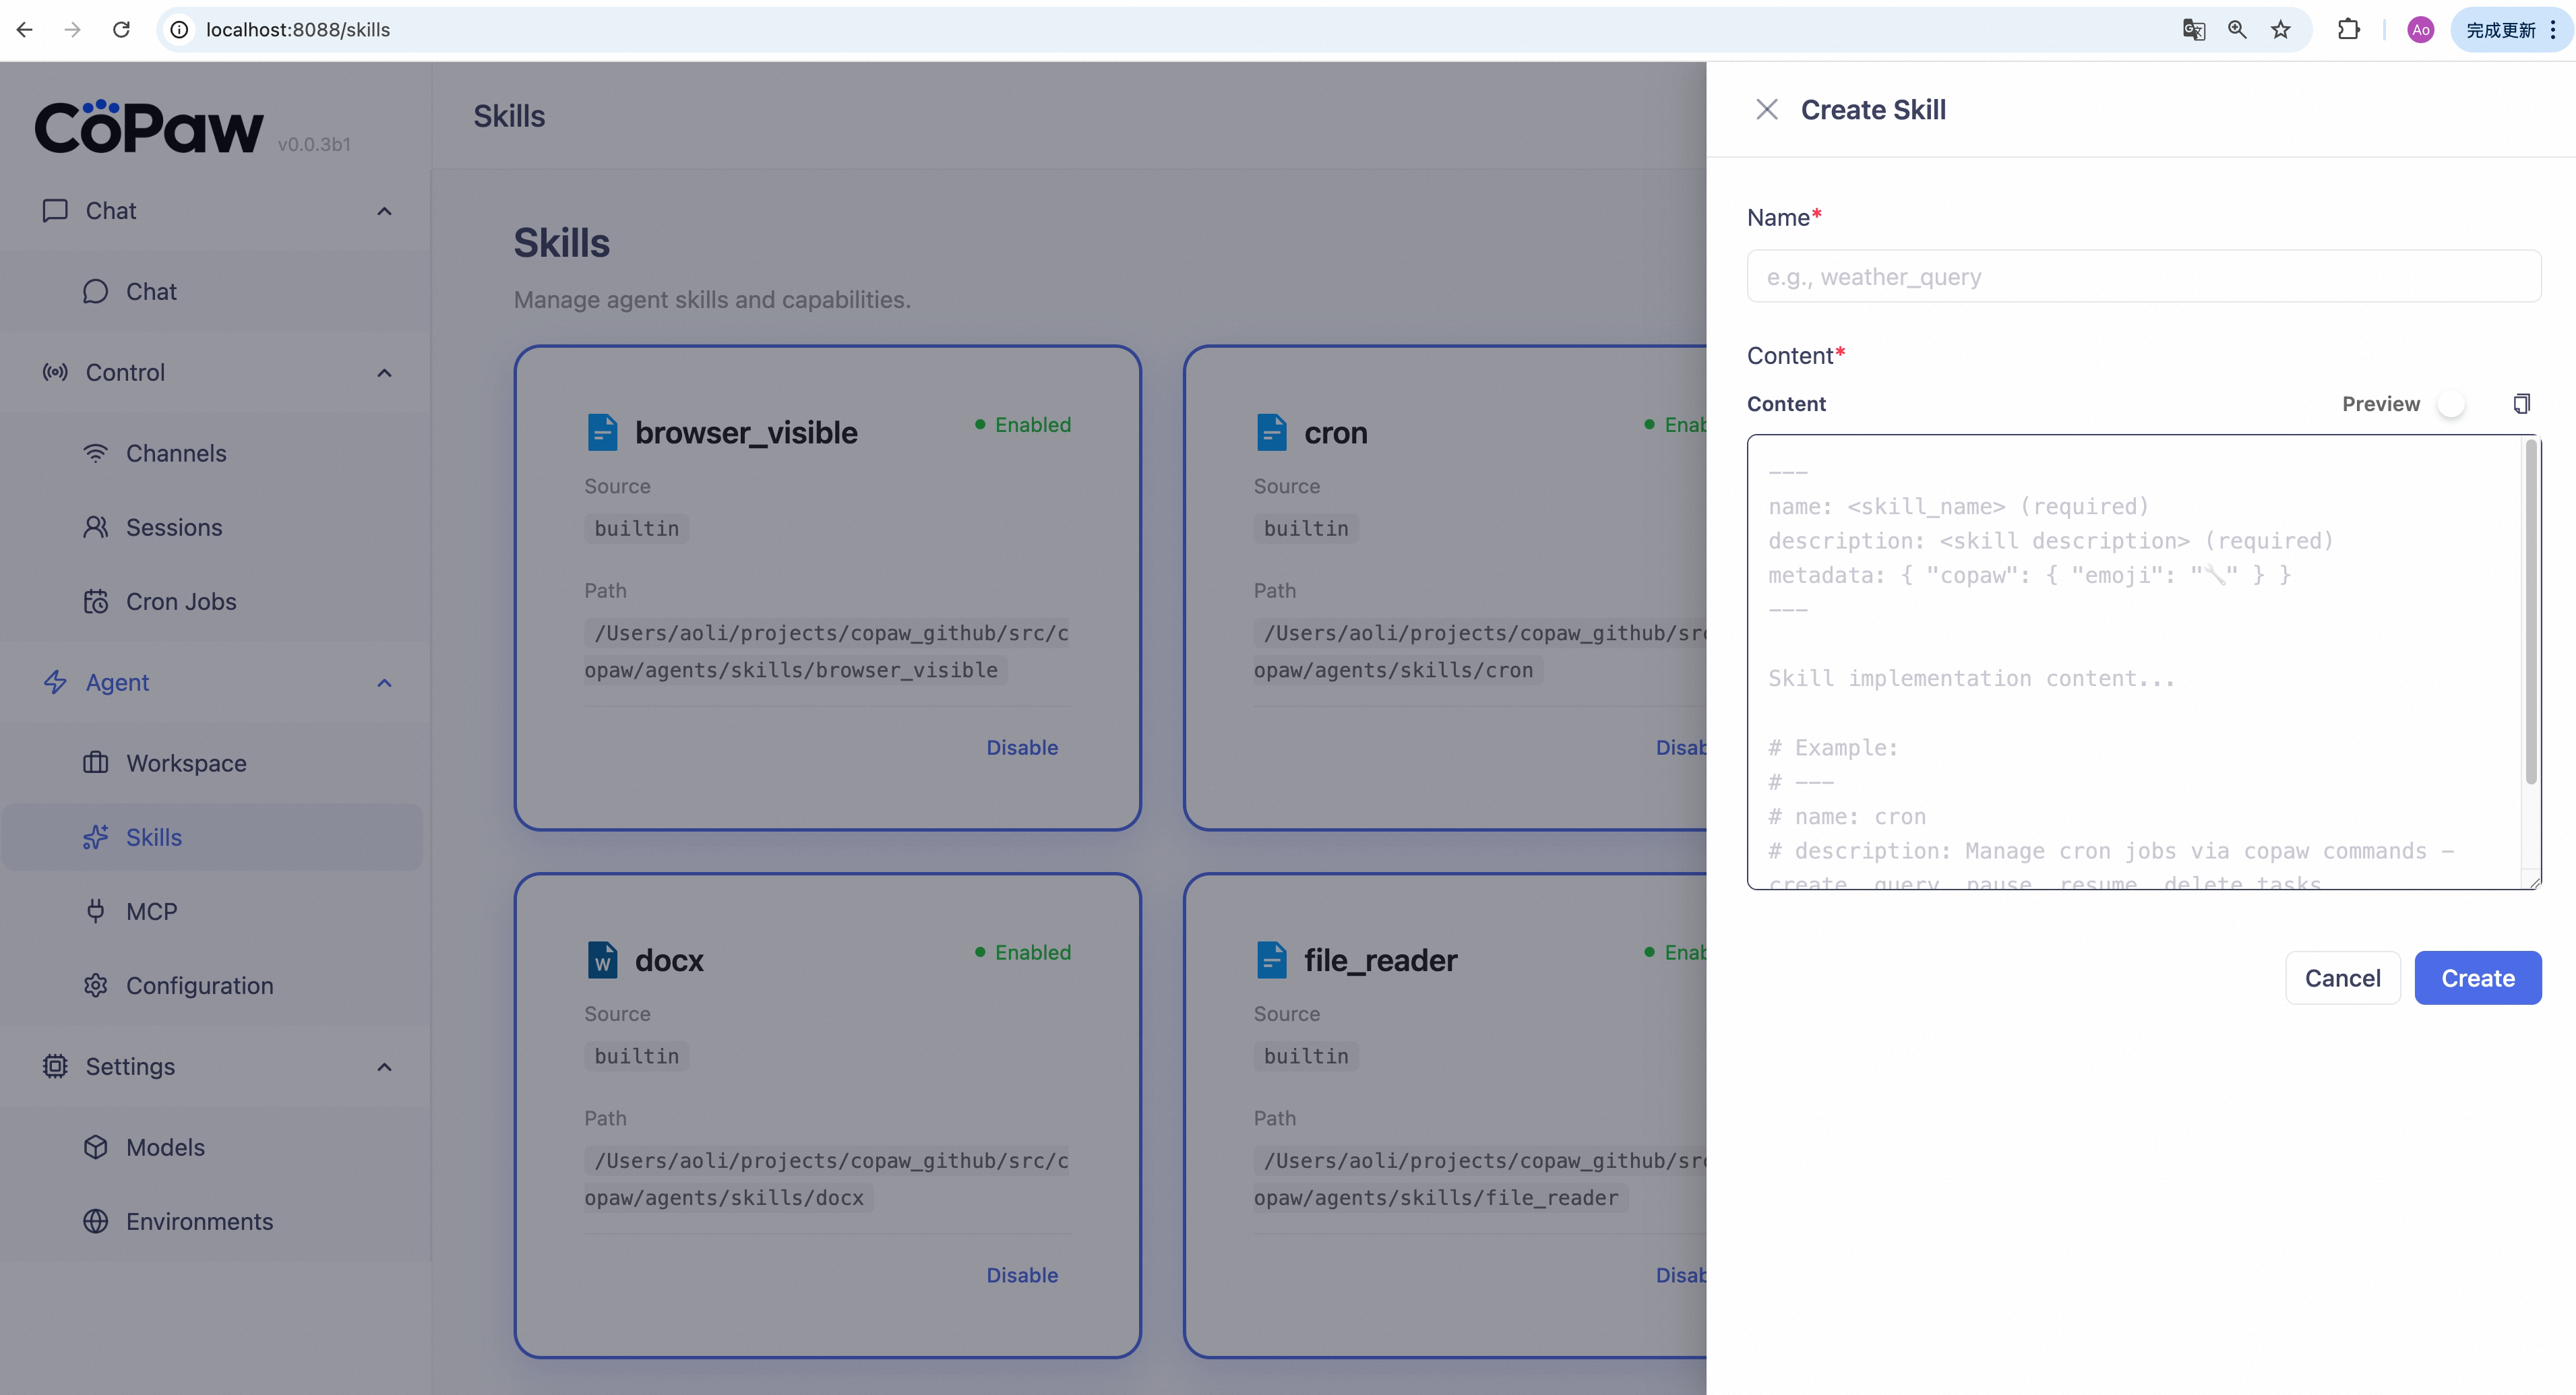
Create a custom skill:
- Click Create Skill.
- Enter a skill name (e.g.
weather_query) and skill content in Markdown (must includenameanddescription). - Click Save. The new skill appears immediately.
Delete a custom skill: Disable the skill first, then click the trash icon on its card and confirm.
For built-in skill details, Skill Hub import, and custom skill authoring, see Skills.
MCP
Sidebar: Agent → MCP
Enable/disable/delete MCP clients here, or create new ones.
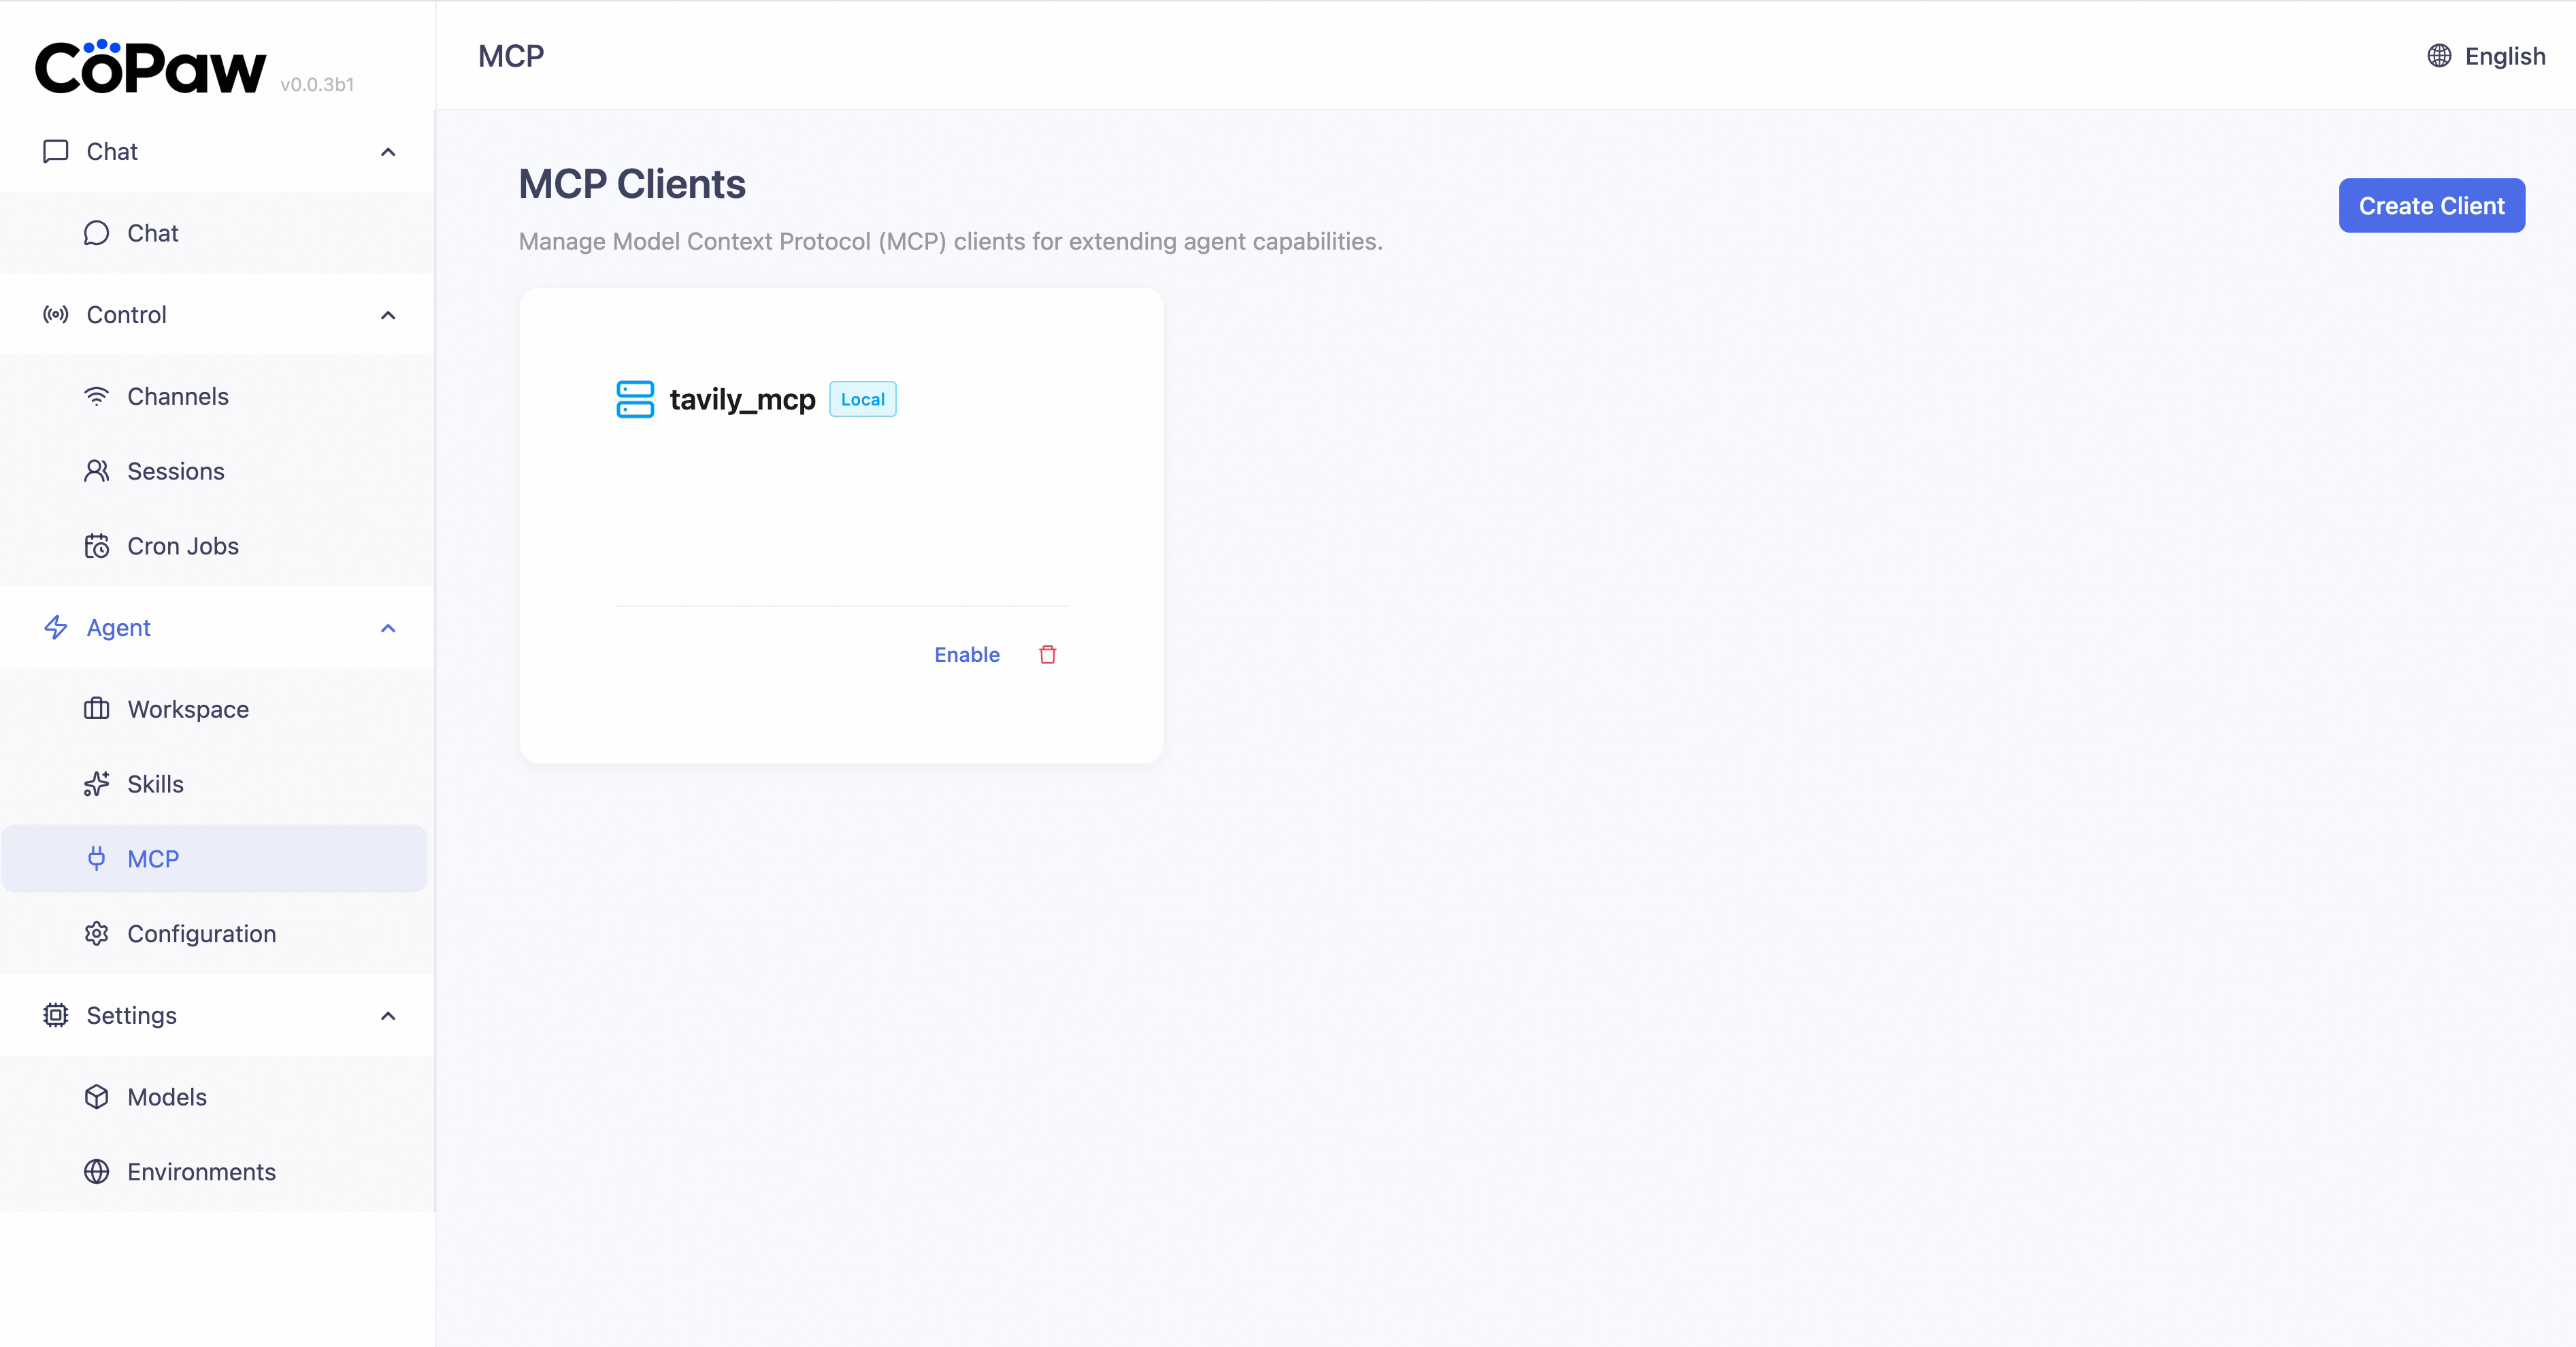
Create a client Click Create Client in the top-right, fill in the required information, then click Create. The new MCP client appears in the list.
Runtime Config
Sidebar: Agent → Runtime Config
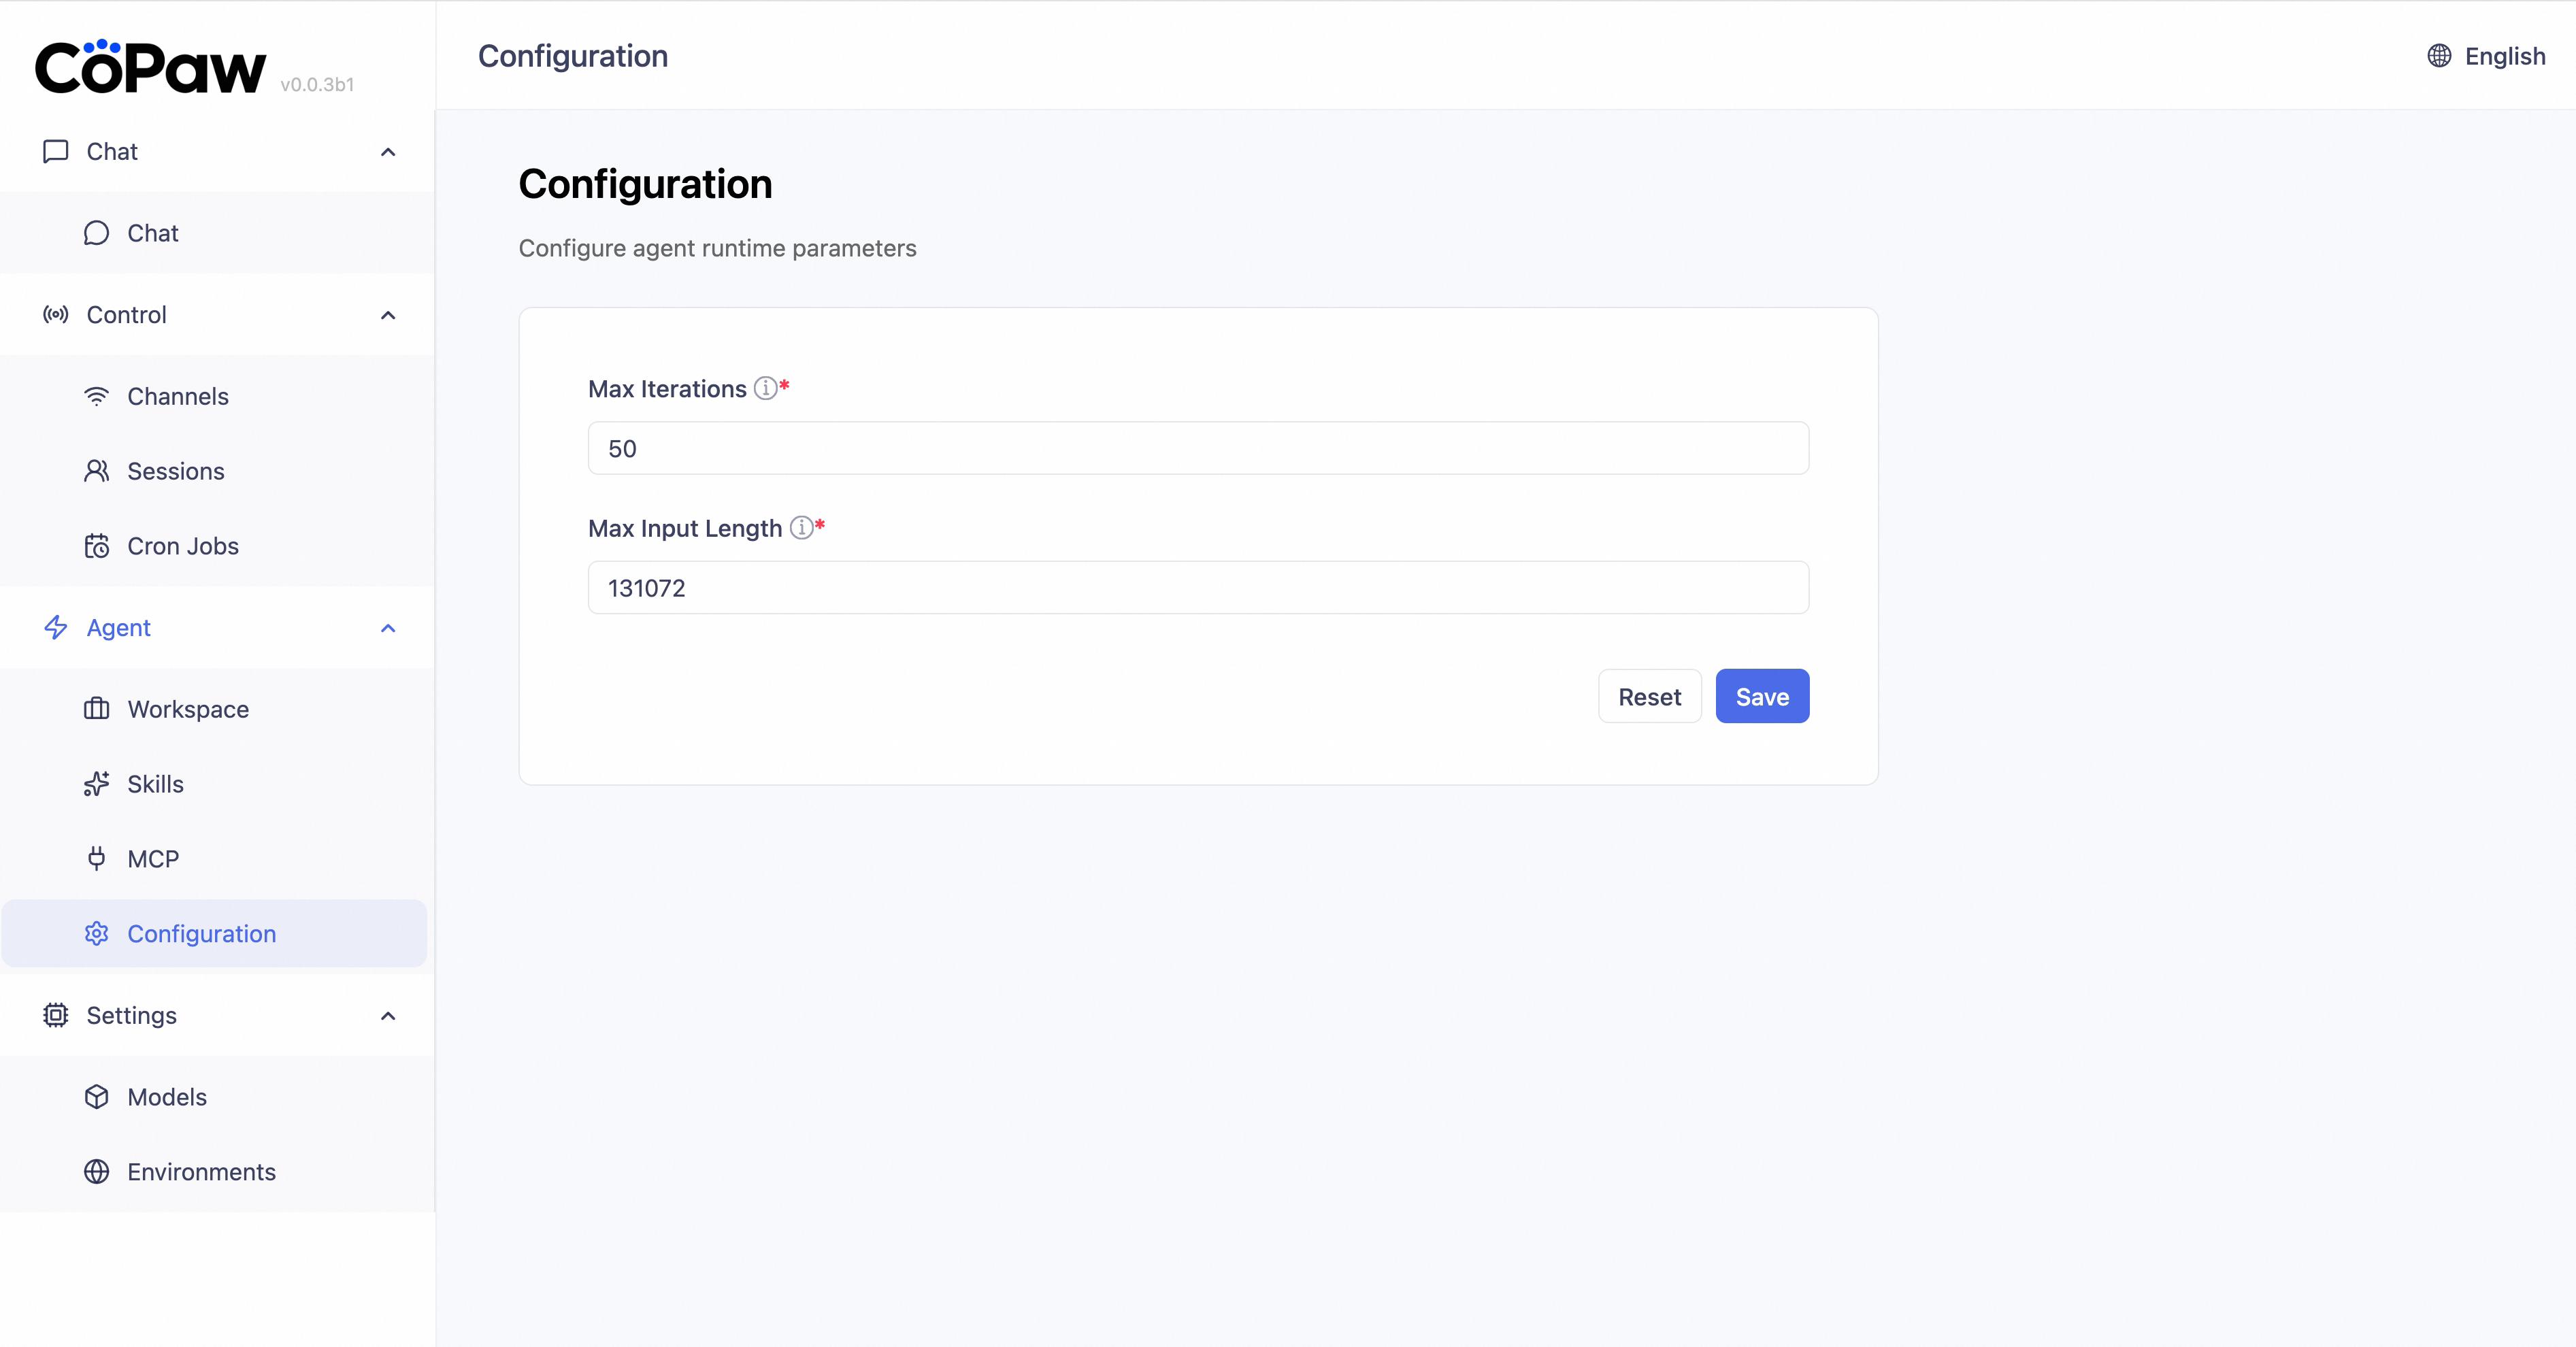
Adjust Max iterations and Max input length here; click Save after changing.
Models
Sidebar: Settings → Models
Configure LLM providers and choose the model CoPaw uses. CoPaw supports both cloud providers (API key required) and local providers (no API key required).
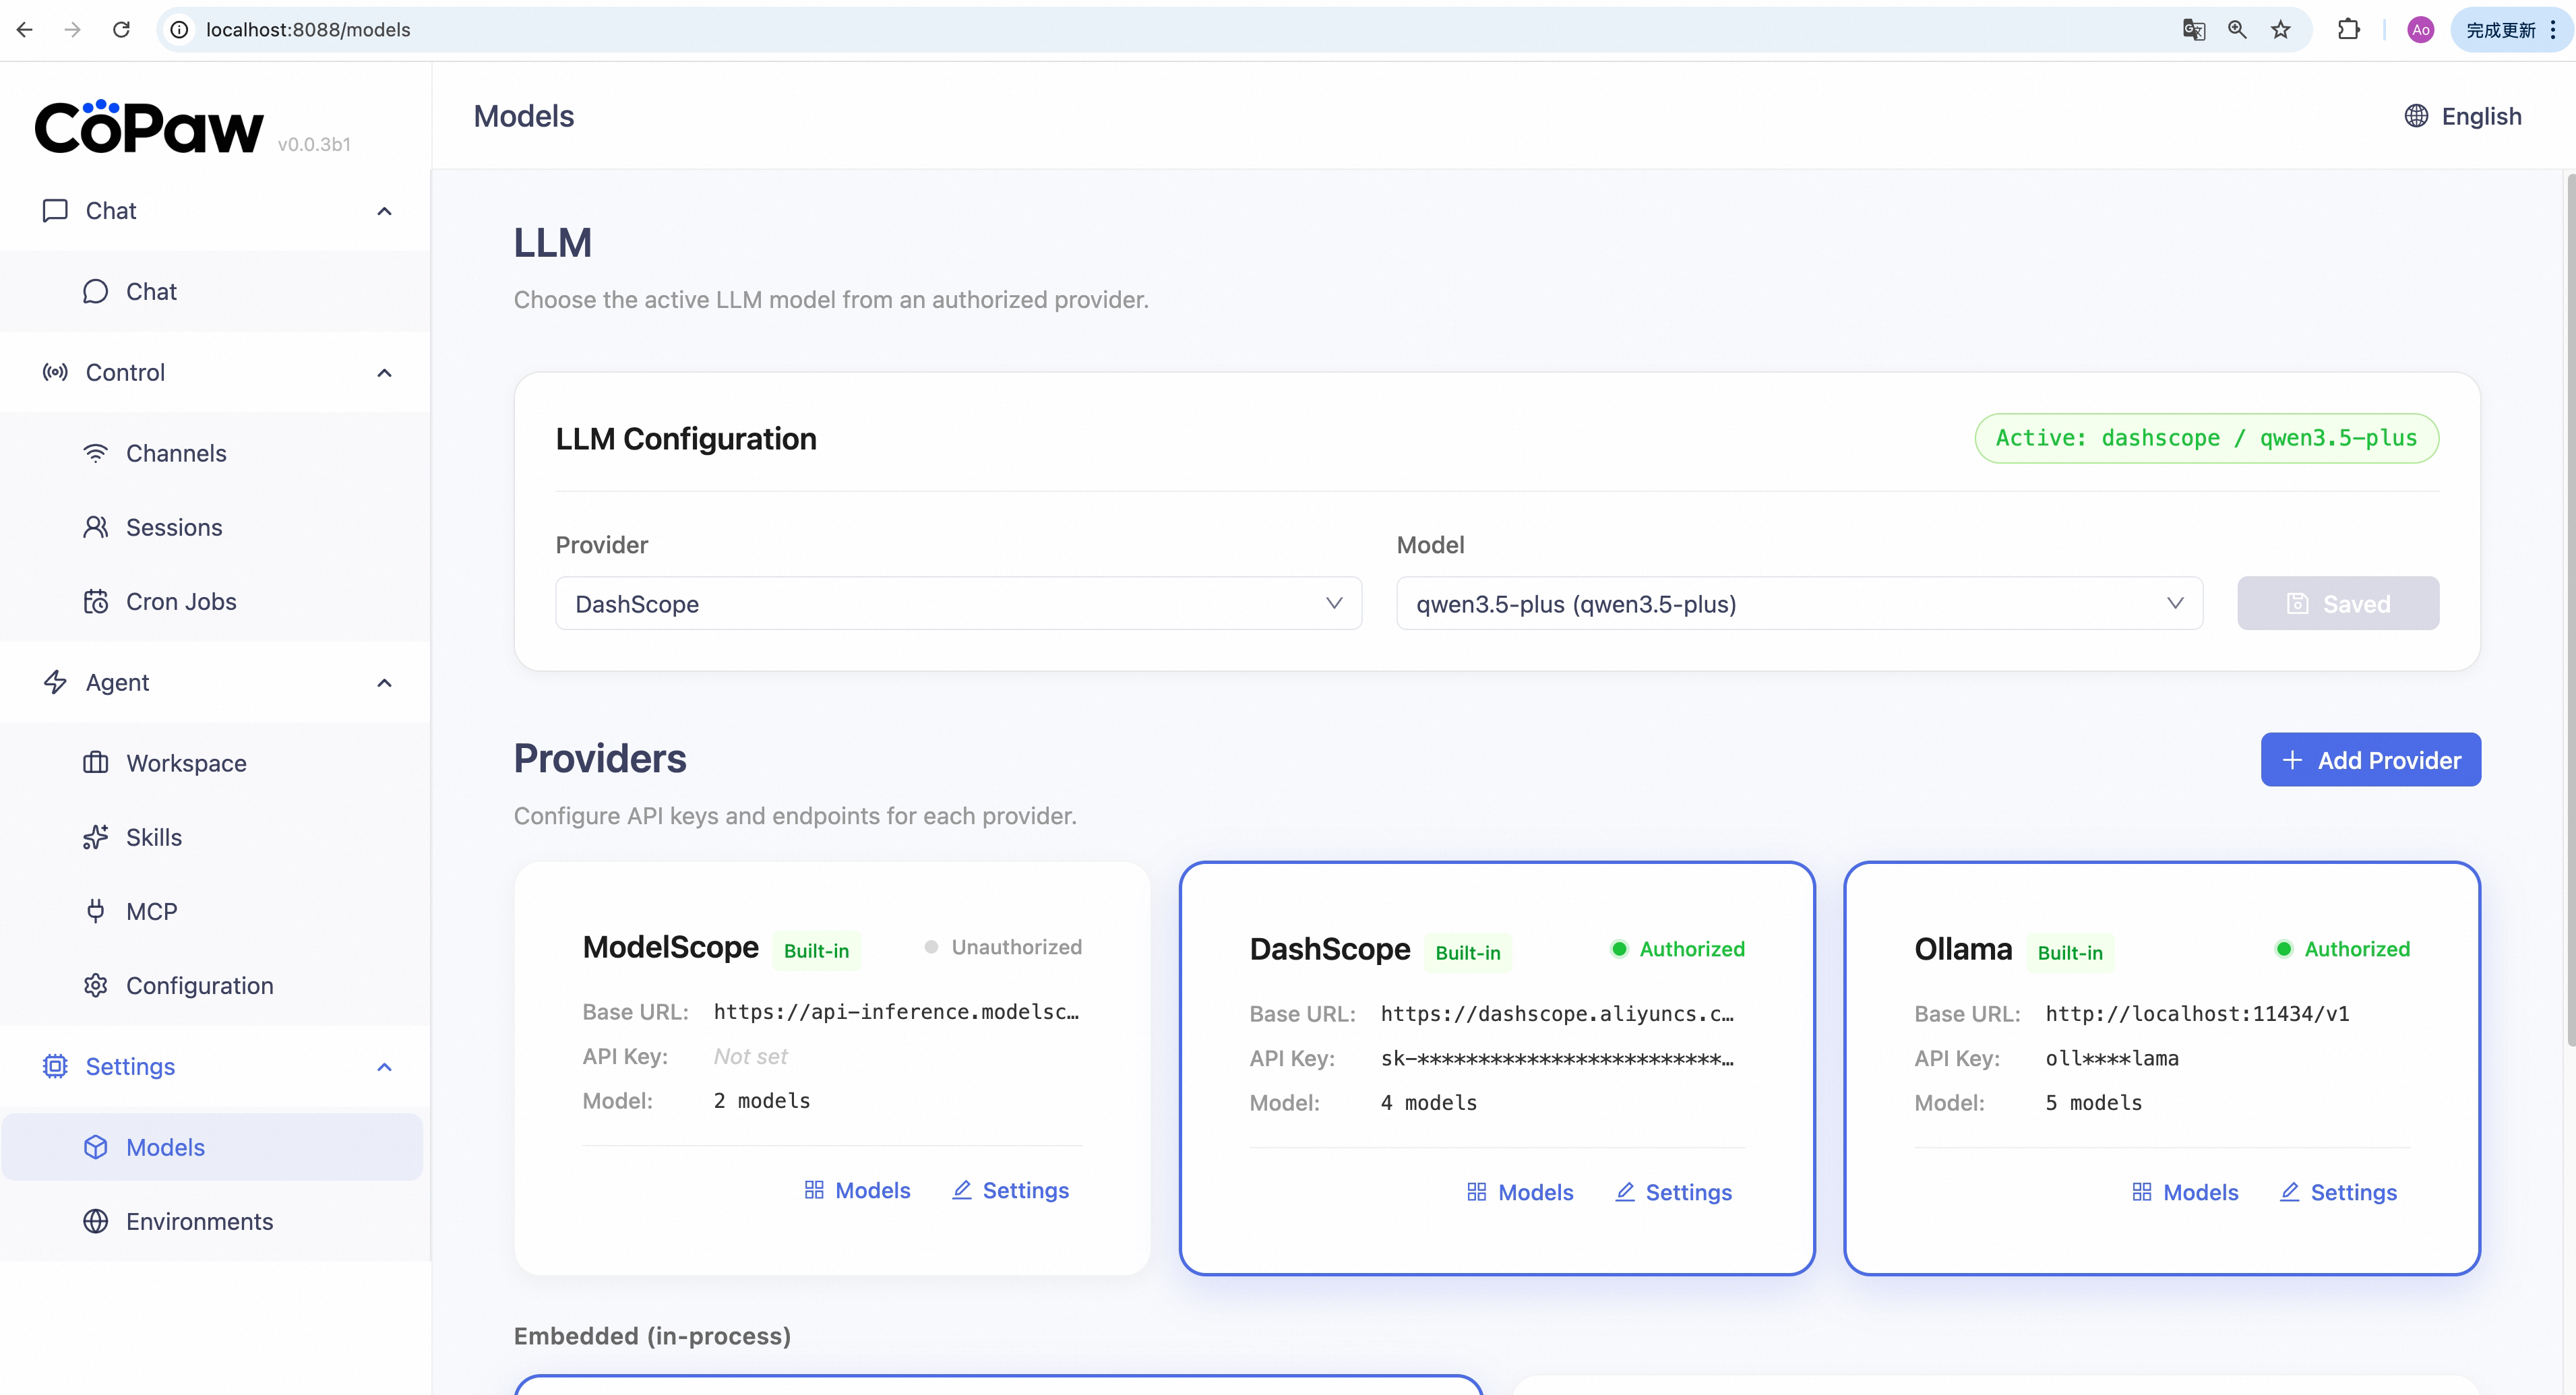
Cloud providers
Configure a provider:
- Click Settings on a provider card (ModelScope, DashScope).
- Enter your API Key.
- Click Save. Card status becomes "Authorized".
- To add a custom provider, click Add Provider.
- Enter provider ID, display name, and required fields, then click Create.
- Open Settings for the created provider, fill required fields, then Save. Status becomes "Authorized".
Revoke authorization: Open the provider settings dialog and click Revoke Authorization. API key data is cleared. If this provider is currently active, model selection is also cleared.
Local providers (llama.cpp / MLX)
Local providers show a purple Local tag. Install backend dependencies
first (pip install 'copaw[llamacpp]' or pip install 'copaw[mlx]').
Download a model:
- Click Manage Models on a local provider card.
- Click Download Model, then fill:
- Repo ID (required) — e.g.
Qwen/Qwen3-4B-GGUF - Filename (optional) — leave empty for auto-selection
- Source — Hugging Face (default) or ModelScope
- Repo ID (required) — e.g.
- Click Download and wait for completion.
View and delete models: Downloaded models are listed with file size, source badge (HF / MS), and delete button.
Ollama provider
The Ollama provider integrates with your local Ollama daemon and dynamically loads models from it.
Prerequisites:
- Install Ollama from ollama.com
- Install the Ollama SDK:
pip install 'copaw[ollama]'(or re-run the installer with--extras ollama)
Download a model:
- Click Settings on the Ollama provider card.
- In API Key, enter a value (for example
ollama), then click Save. - Click Manage Models on the Ollama card, click Download Model, and
enter a model name (e.g.
mistral:7b,qwen3:8b). - Click Download Model and wait for completion.
Cancel a download: During download, click × next to the progress indicator to cancel.
View and delete models: Downloaded models are listed with size and delete button. The list updates automatically when models are added/removed via Ollama CLI or Console.
How it differs from local providers:
- Models come from the Ollama daemon (not downloaded directly by CoPaw)
- Model list is auto-synced with Ollama
- Popular model examples:
mistral:7b,qwen3:8b
You can also manage Ollama models via CLI:
copaw models ollama-pull,copaw models ollama-list,copaw models ollama-remove. See CLI.
Choose the active model
- In the LLM Config section, select a Provider from the dropdown (only authorized providers or local providers with downloaded models appear).
- Select a Model from the model dropdown.
- Click Save.
Note: Cloud API key validity is your responsibility. CoPaw does not verify key correctness.
For provider details, see Config — LLM Providers.
Environment Variables
Sidebar: Settings → Environment Variables
Manage runtime environment variables needed by CoPaw tools and skills
(for example, TAVILY_API_KEY).
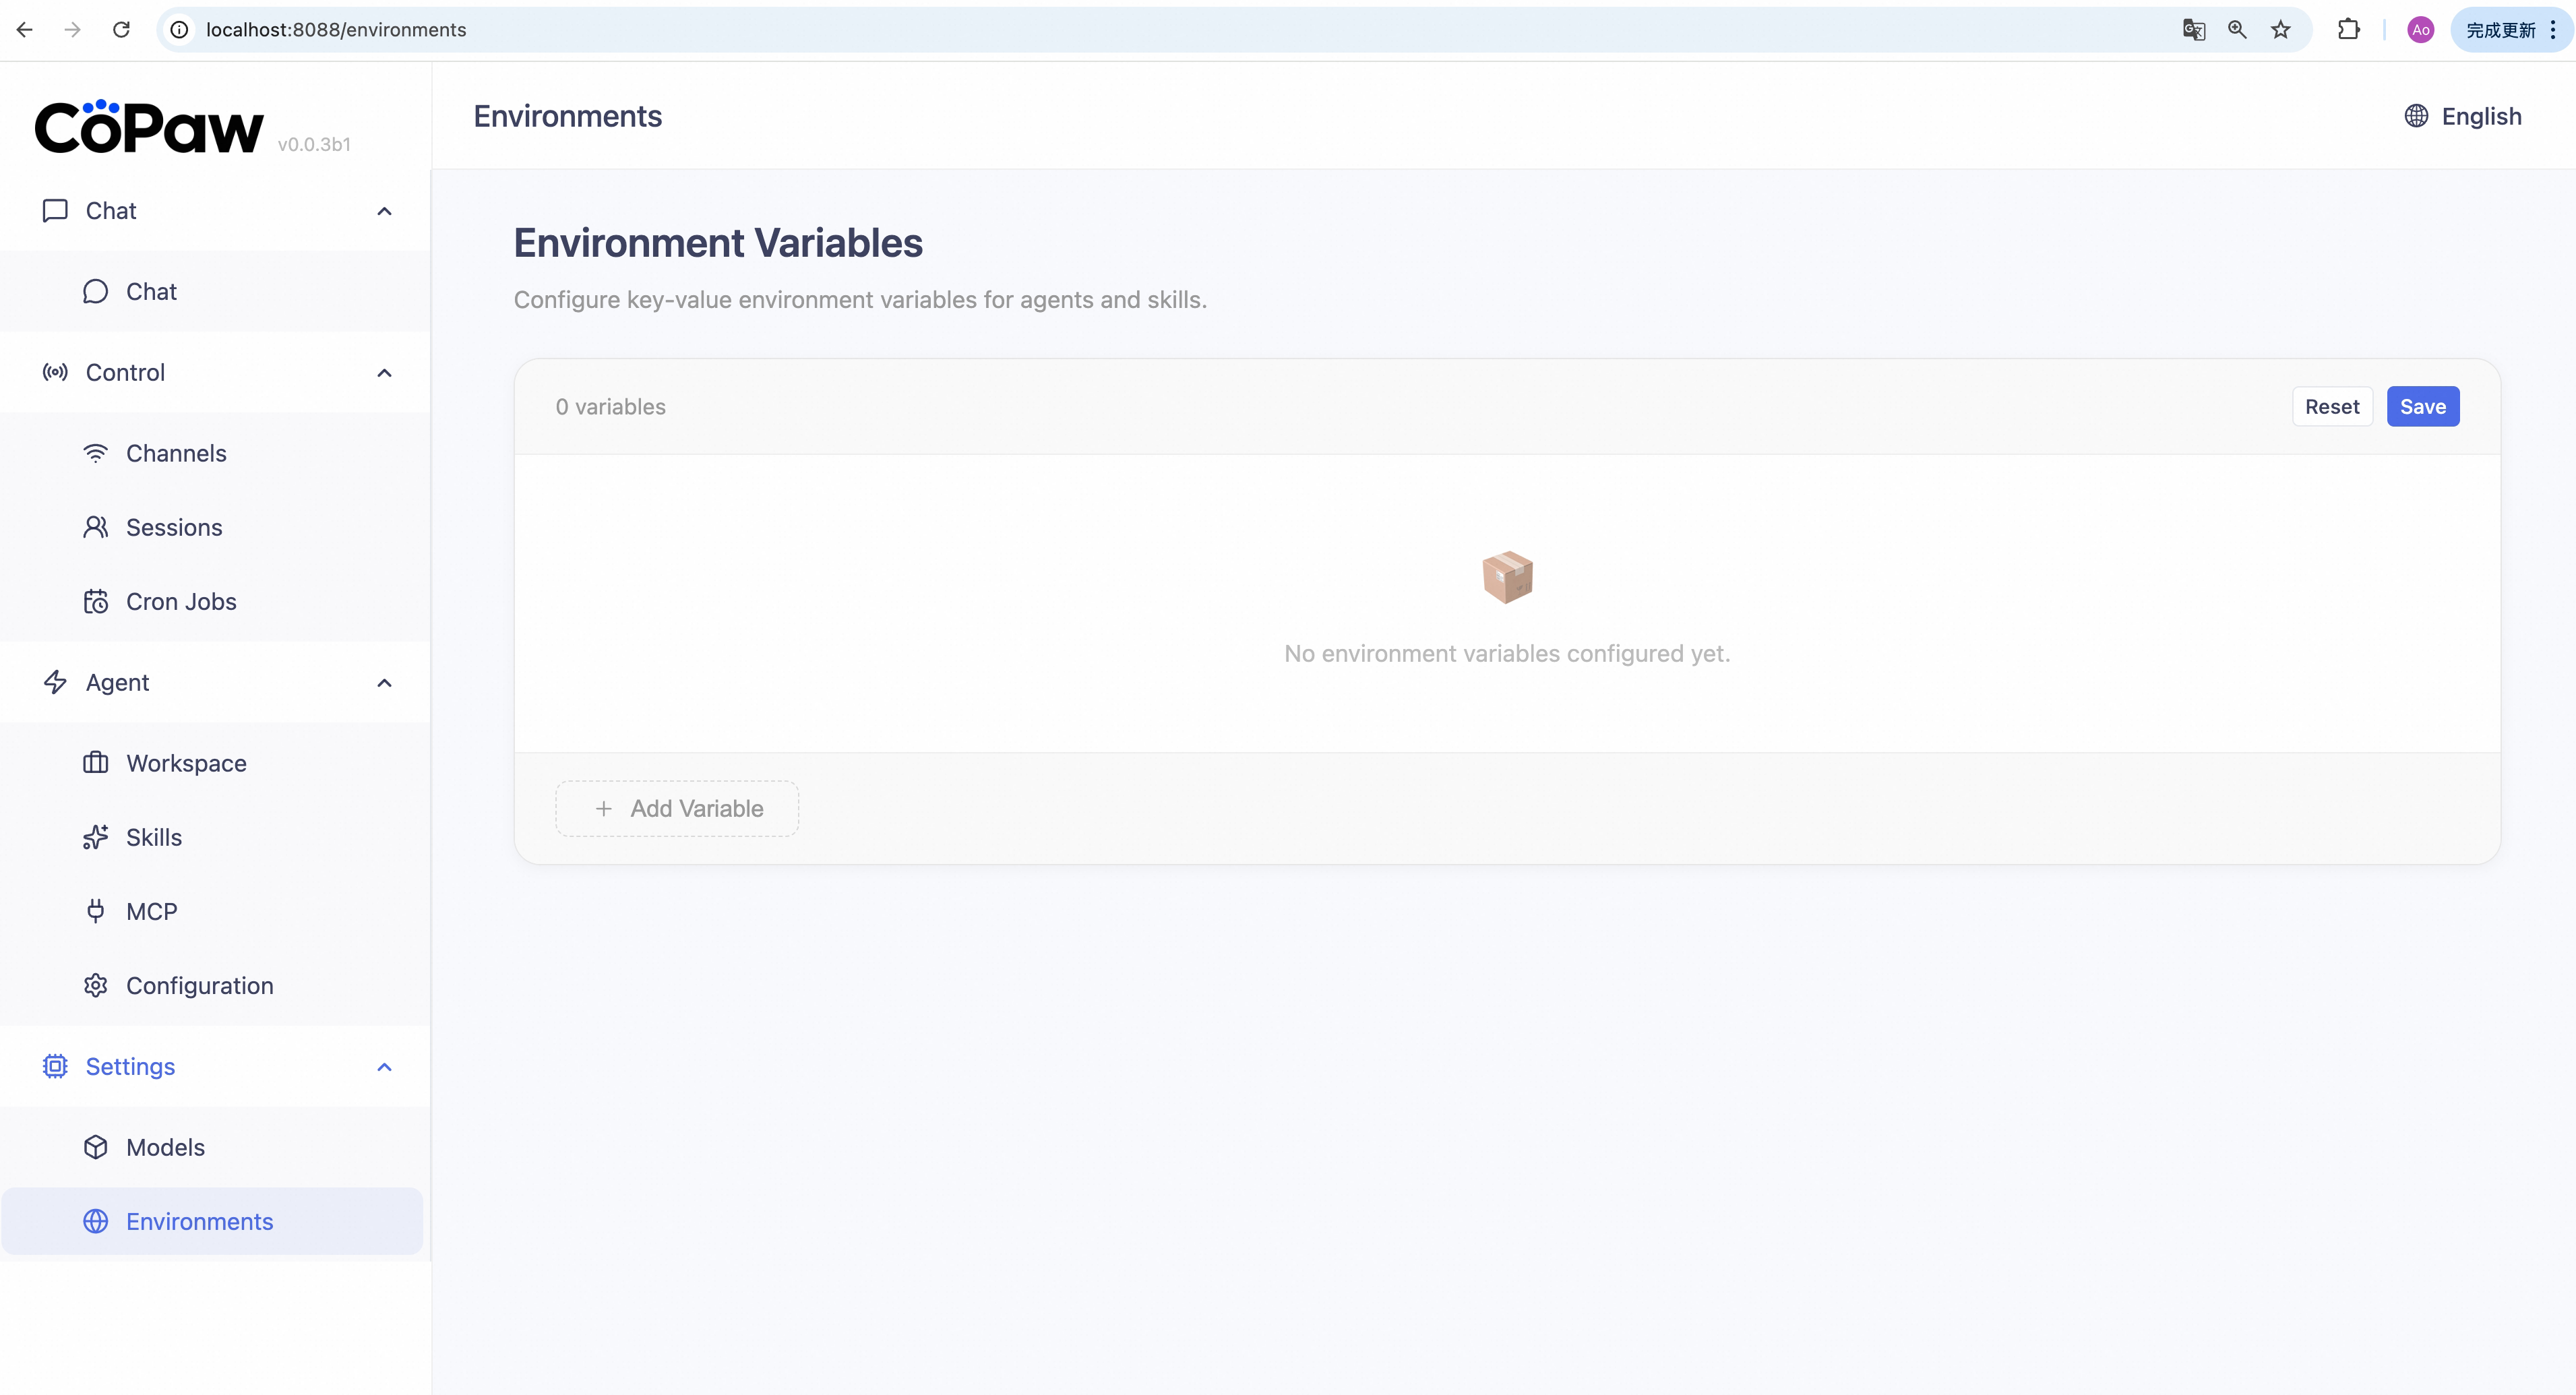
Add a variable:
- Click + Add Variable.
- Enter the variable name (e.g.
TAVILY_API_KEY) and value. - Click Save.
Edit a variable: Change the Value field, then click Save. (Variable names are read-only after save; to rename, delete and recreate.)
Delete a variable: Click the trash icon on a row, then confirm if prompted.
Batch delete: Select rows → click Delete in the toolbar → confirm.
Note: Variable validity is your responsibility. CoPaw only stores and loads values.
See Config — Environment Variables for more.
Quick Reference
| Page | Sidebar path | What you can do |
|---|---|---|
| Chat | Chat → Chat | Talk with CoPaw, manage sessions |
| Channels | Control → Channels | Enable/disable channels, configure credentials |
| Sessions | Control → Sessions | Filter, rename, delete sessions |
| Cron Jobs | Control → Cron Jobs | Create/edit/delete jobs, run immediately |
| Workspace | Agent → Workspace | Edit persona files, view memory, upload/download |
| Skills | Agent → Skills | Enable/disable/create/delete skills |
| MCP | Agent → MCP | Enable/disable/create/delete MCP clients |
| Runtime Config | Agent → Runtime Config | Modify runtime configuration |
| Models | Settings → Models | Configure providers, manage local/Ollama, pick model |
| Environment Variables | Settings → Environment Variables | Add/edit/delete environment variables |
Related Pages
- Config & Working Directory — Config fields, providers, env vars
- Channels — Per-channel setup and credentials
- Skills — Built-in skills and custom skills
- Heartbeat — Heartbeat configuration
- CLI — Command-line reference